How to Convert Byte Array to String in C#

In .NET, a byte is just a number from 0 to 255 (the numbers that can be represented by eight bits). So, a byte array is just an array of the numbers from 0 to255. At a lower level, an array is a contiguous block of memory, and a byte array is just a representation of that memory in 8-bit blocks.

Let's say you have a Byte[] array loaded from a file and you need to convert it to a String.

1. Encoding's GetString
but you won't be able to get the original bytes back if those bytes have non-ASCII characters

byte[] bytes = { 130, 200, 234, 23 }; // A byte array contains non-ASCII (or non-readable) characters
string Enco = Encoding.UTF8.GetString(bytes); 
byte[] decBytes1 = Encoding.UTF8.GetBytes(Enco);  // decBytes1.Length == 10 !!
// decBytes1 not same as bytes
// Using UTF-8 or other Encoding object will get similar results

2. BitConverter.ToString
The output is a "-" delimited string, but there's no .NET built-in method to convert the string back   to byte array.

string Bitconvo = BitConverter.ToString(bytes);   // 82-C8-EA-17
String[] tempAry = Bitconvo.Split('-');
byte[] decBytes2 = new byte[tempAry.Length];
for (int i = 0; i < tempAry.Length; i++)
    decBytes2[i] = Convert.ToByte(tempAry[i], 16);
// decBytes2 same as bytes

3. Convert.ToBase64String
You can easily convert the output string back to byte array by using Convert.FromBase64String.
Note: The output string could contain '+', '/' and '='. If you want to use the string in a URL, you need to explicitly encode it.

string B64 = Convert.ToBase64String(bytes);  
byte[] decByte3 = Convert.FromBase64String(B64);
// decByte3 same as bytes

4. HttpServerUtility.UrlTokenEncode
You can easily convert the output string back to byte array by using HttpServerUtility.UrlTokenDecode. The output string is already URL friendly! The downside is it needs System.Web assembly if your project is not a web project.

string s3 = Convert.ToBase64String(bytes);  // gsjqFw==
byte[] decByte3 = Convert.FromBase64String(s3);
// decByte3 same as bytes

Credits : combo_ci

How to Make Excel Spreadsheets [.XLS &.XLSX] in C#

How to Make Excel Spreadsheets [.XLS &.XLSX] in C#

There's a library called ExcelLibrary. It's a free, open source library posted on Google Code. It's very simple, small and easy to use. Plus it has a DataSetHelper that lets you use DataSets and DataTables to easily work with Excel data.

ExcelLibrary seems to still only work for the older Excel format (.xls files), but may be adding support in the future for newer 2007/2010 formats. You can also use EPPlus, which works only for Excel 2007/2010 format files (.xlsx files).

Here are a couple links for quick reference:
ExcelLibrary - GNU Lesser GPL
EPPlus - GNU Library General Public License (LGPL)

Here's some example code for ExcelLibrary:

//create new xls file
string file = "C:\\newdoc.xls";
Workbook workbook = new Workbook();
Worksheet worksheet = new Worksheet("First Sheet");
worksheet.Cells[0, 1] = new Cell((short)1);
worksheet.Cells[2, 0] = new Cell(9999999);
worksheet.Cells[3, 3] = new Cell((decimal)3.45);
worksheet.Cells[2, 2] = new Cell("Text string");
worksheet.Cells[2, 4] = new Cell("Second string");
worksheet.Cells[4, 0] = new Cell(32764.5, "#,##0.00");
worksheet.Cells[5, 1] = new Cell(DateTime.Now, @"YYYY\-MM\-DD");
worksheet.Cells.ColumnWidth[0, 1] = 3000;
workbook.Worksheets.Add(worksheet);
workbook.Save(file);

// open xls file
Workbook book = Workbook.Load(file);
Worksheet sheet = book.Worksheets[0];

 // traverse cells
 foreach (Pair<Pair<int, int>, Cell> cell in sheet.Cells)
 {
     dgvCells[cell.Left.Right, cell.Left.Left].Value = cell.Right.Value;
 }

 // traverse rows by Index
 for (int rowIndex = sheet.Cells.FirstRowIndex;
        rowIndex <= sheet.Cells.LastRowIndex; rowIndex++)
 {
     Row row = sheet.Cells.GetRow(rowIndex);
     for (int colIndex = row.FirstColIndex;
        colIndex <= row.LastColIndex; colIndex++)
     {
         Cell cell = row.GetCell(colIndex);
     }
 }

Creating the Excel file is as easy as that. You can also manually create Excel files, but the above functionality is what really impressed me.

Credits : Mike Webb

How to Send SMS in C# Using GSM Modem/Dongle


How to Send SMS in C# Using GSM Modem/Dongle
This is a very simple method to send SMS via GSM Modem so without much explanations let's get into it.

Thing's you'll need :
  • GSM Modem with a SIM
  • Libraries :
    GSMCommServer.dll
    GSMCommShared.dll
    GSMCommunication.dll
    PDUConverter.dll
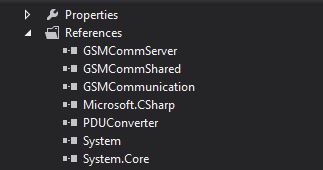
If you've installed the Modem software you'll be able find all the libraries needed. Just go to add Reference and add the mentioned libraries (without them this program won't work).

How to Send SMS in C# Using GSM Modem/Dongle

Now go to your form and add control as given below
  • 4 Labels :
    Label1 - Message Body :
    Label2 - Phone Number :
    Label3 - Port :
    Label4 - Modem Not Connected
  • 2 Textboxes :
    Textbox1 - To Phone Number
    Textbox2 - To Message Body
  • 1 ComboBox :
    Combobox1 - To Port :
  • 2 Buttons
    Button1 - Send
    Button2 - Connect
 Arrange your form like this :

How to Send SMS in C# Using GSM Modem/Dongle

 Now let's go to the coding

Namespaces :
 using GsmComm.GsmCommunication;  
 using GsmComm.PduConverter;  
 using GsmComm.Server;  

Add this above Public Form1 :

 private GsmCommMain comm;  

Form1_Load :
 Combobox1.Items.Add("COM1");  
 Combobox1.Items.Add("COM2");  
 Combobox1.Items.Add("COM3");  
 Combobox1.Items.Add("COM4");  
 Combobox1.Items.Add("COM5");  

Button2_Click :
 if (Combobox1.Text == "")  
       {  
         MessageBox.Show("Invalid Port Name");  
         return;  
       }  
       comm = new GsmCommMain(Combobox1.Text, 9600, 150);  
       Cursor.Current = Cursors.Default;  
       bool retry;  
       do  
       {  
         retry = false;  
         try  
         {  
           Cursor.Current = Cursors.WaitCursor;  
           comm.Open();  
           MessageBox.Show("Modem Connected Sucessfully");  
           Button2.Enabled = false;  
           label4.Text = "Modem is connected";  
         }  
         catch (Exception)  
         {  
           Cursor.Current = Cursors.Default;  
           if (MessageBox.Show(this, "GSM Modem is not available", "Check",  
             MessageBoxButtons.RetryCancel, MessageBoxIcon.Warning) == DialogResult.Retry)  
             retry = true;  
           else  
           { return; }  
         }  
       }  
       while (retry);  

Button1_Click :
 try  
       {  
         Cursor.Current = Cursors.WaitCursor;  
         SmsSubmitPdu pdu;  
           Cursor.Current = Cursors.Default;  
           byte dcs = (byte)DataCodingScheme.GeneralCoding.Alpha7BitDefault;  
           pdu = new SmsSubmitPdu(Textbox2.Text, Textbox1.Text);  
           int times = 1;  
           for (int i = 0; i < times; i++)  
           {  
             comm.SendMessage(pdu);  
           }  
         MessageBox.Show("Message Sent Succesfully","Success",MessageBoxButtons.OK,MessageBoxIcon.Information);  
       }  
       catch(Exception ex)  
       {  
         MessageBox.Show(ex.Message.ToString());  
       }  

That's all, Do share your comments.


Credits : Rotich

How to Make a WIFI Hotspot Creator in VB.NET


You'll find many programs on the internet that can turn your Computer/Laptop Internet into a WIFI Hotspot but this ain't no any advanced like this. This is a very simple program to make a WIFI Hotspot using the Netsh command line scripting utility that comes with Windows.

Let's get into it...

Tools Required
  • 2 Textboxes
  • 2 Labels
  • 1 Checkbox
  • 2 Buttons
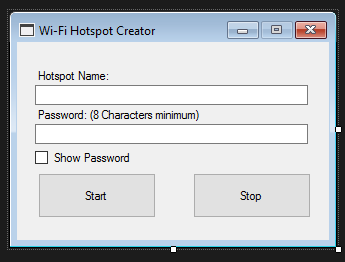
Change TEXT in the added Tools like given below
  • Label 1 - Hotspot Name:
  • Label 2 - Password: (8 Characters minimum)
  • CheckBox1 - Show Password
  • Button1 - Start
  • Button2 - Stop
Make sure your FORM looks like this :


Double click your Form to get into Form_Load Event and add this code to disable the Button2 (Stop)
 Button2.Enabled = False
Add this code for FormClosed Event to stop the Hotspot automatically when you close the program
Process.Start("CMD", "/C netsh wlan stop hostednetwork")
  Now go to Button1_Click and add these :

   Try  
       If TextBox1.Text = "" Then  
         MsgBox("Hotspot Name can't be empty", MsgBoxStyle.Critical)  
       End If  
       If TextBox2.TextLength < 8 Then  
         MsgBox("Password should be 8+ characters", MsgBoxStyle.Critical)  
         If TextBox2.Text = "" Then  
           MsgBox("Password can't be empty", MsgBoxStyle.Critical)  
         End If  
       Else  
         Dim process As New Process()  
         process.StartInfo.Verb = "runas"  
         process.StartInfo.UseShellExecute = True  
         process.Start("cmd", String.Format("/c {0} & {1} & {2}", "netsh wlan set hostednetwork mode=allow ssid=" & TextBox1.Text & " key=" & TextBox2.Text, "netsh wlan start hostednetwork", "pause"))  
         MsgBox("Hotspot started successfully", MsgBoxStyle.Information)  
         Button1.Enabled = False  
         Button2.Enabled = True  
       End If  
     Catch ex As Exception  
       MsgBox("Failed to establish a hotspot" & ex.Message, MsgBoxStyle.Information)  
     End Try  

Add this to Button2_Click :

   Button2.Enabled = False  
     Process.Start("CMD", "/C netsh wlan stop hostednetwork")  
     Button1.Enabled = True  
     MsgBox("Hotspot stopped successfully", MsgBoxStyle.Information)  

Finally just go add this piece of code to CheckBox1_Checked :

     If CheckBox1.CheckState = CheckState.Checked Then  
       TextBox2.UseSystemPasswordChar = False  
     End If  
     If CheckBox1.CheckState = CheckState.Unchecked Then  
       TextBox2.UseSystemPasswordChar = True  
     End If  

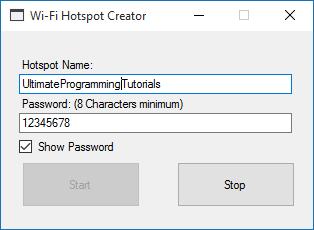
That's it! let's Run the program, Just set a Hotspot Name and a Password then click on Start


Now check your Phone or any other devices for WIFI connections, this is a screenshot from my Phone :


Hope it works fine with y'all...

Convert Strings to Upper Case in JavaScript

Convert Strings to Upper Case in JavaScript

This will teach you the way to convert strings to upper case in javascript. we will use these if we've a text field needs to capitalized all inputted text or simply the 1st letter of the word.

Source :


Hope you learn from this

How To Make a Age Calculator in Java

This is a age calculator made in java, it's a console application by the way :)

source :

 import java.util.GregorianCalendar;
import java.util.Scanner;
import java.util.InputMismatchException;

public class age_calculator {

    public static void main(String[] args) {
        int day = 0;
        int month = 0;
        int year = 0;
        Scanner scan = new Scanner(System.in);
  try{
         System.out.print("Day: ");
         day = scan.nextInt();
         System.out.print("Month: ");
         month = scan.nextInt();
         System.out.print("Year: ");
         year = scan.nextInt();
  }
  catch(InputMismatchException e){
   System.out.println("Error: You entered an invalid number");
   System.exit(1);
  }
        System.out.println("\nYou are " + getAge(day,month,year) + " years old");
    }

    public static int getAge(int day, int month, int year){
  final int ERROR = -1;

        //initialize GregorianCalendar with current date
        GregorianCalendar cal = new GregorianCalendar();
        //constant holds current day
        final int CDAY = cal.get(GregorianCalendar.DAY_OF_MONTH);
        //constant hold current month
        final int CMONTH = cal.get(GregorianCalendar.MONTH) + 1;
        //constant to hold current year
        final int CYEAR = cal.get(GregorianCalendar.YEAR);
        //check if current day of the month is greater then birth day
        if (month == CMONTH){
            if(CDAY >= day)
                return CYEAR - year;
   if(CDAY < day)
    return CYEAR - year - 1;
        }
        //check if birth month is less then current month
        else if(month < CMONTH)
            return CYEAR - year;
        //subtract 1 from the age because  the current day in the month is less then birth date
  else
         return CYEAR - year - 1;
  return ERROR;
    }

} 

screenshot :
 How To Make a Age Calculator in Java
 Hope it helped you :)

How to Turn a Static Website Into a WordPress Theme?


Still a number of business owners are running a static HTML website. But when it comes to making changes in the static site, it becomes mandatory for the website owner to have HTML programming knowledge. So, if you lack coding skills you must migrate your static site to a dynamic platform. WordPress is a highly popular dynamic platform and its popularity is not going to abate too soon. You don't have to throw all your HTML and CSS files away when moving to WP platform. Rather you can convert your HTML files to WordPress.

When converting HTML files to Wordpress theme, generally WP default theme named TwentyThirteen is being used. To carry out the conversion you'll need a copy of HTML as well as CSS files for your current site, which will be later converted to WP theme format. There are various choices you get in terms of the program, which is used to make edits in your file. Well, you can choose text-editors such as Notepad and Notepad++ or rather use Dreamweaver instead. For this purpose, you can take up HTML to Wordpress Service.

Here's a step-by-step procedure following which you'll be able to Convert HTML to Wordpress Theme.

Step 1: Creation of Files and Folders

Begin with creating a new folder on your system’s desktop. Next, give a name to the folder. Choosing an easy to remember name won't let you forget where the folder is saved, such as the name of your WPTheme. Once you've named your folder create two files namely style.css and index.php, and add both these files to the newly built folder.

In order to make your WordPress platform recognize the files you've just created, make sure to create a comment block for the style.css file including the information like theme name, URI, a brief description, version, author and author URI.

Later, verify whether the TwentyThirteen theme is set to be your active WP theme or not. Subsequently, in the WP admin panel go to Appearance and then the Editor. Open your style.css file and copy the content from it, and paste it into the newly built style.css file.

Step 2: Create new PHP files

To Convert HTML to Wordpress Theme in the second step you'll need to open WP theme editor, wherein your existing theme will be segregated into different parts – the header, footer, sidebar and main index. You can make use of the same components for building some other WP themed site. For doing so, you'll need to divide the components into different PHP files. Next, all you need to do is to copy of the code of each HTML section and place them in their respective PHP files.

Get logged in your WP admin panel. Open the theme editor followed by the file in which you want to copy the code. For instance, open header.php file of your static website; copy the code and then paste it into the newly crafted header.php file. Follow the same procedure for rest of the files.

Step 3: Use Newly Created PHP files to fetch data

To bring in data from newly crafted PHP files, open the index.php file in your WP theme folder saved on your desktop. Add PHP code to your file top and just after the tag, as show below:


Now you have constructed your own WP theme. But wait! Your theme is developed, but you may find it to be blank. You'll have to add content to it.

Step 4: Add your content

Now you may have to add content in your theme. How will you display the content in your tailor-made WP theme? For this purpose, you require WordPress’ loop function – The Loop.

Installing the loop function, requires copying the following code into your index.php template.


Step 5: Initiate your Theme

To set-up your theme, visit a FTP client and sign in to your website directory.

Go to wp-content>>themes folder.

Upload your new theme folder to this folder. Open your WordPress admin panel, go to Appearance>>themes tab. Your theme will now be visible just click on Activate.

That's it, you are done!

About Author:

Sarah Parker is a developer comes technical writer at Designs2HTML Ltd. She loves to share relevant and useful tutorials on WordPress markup conversions on Twitter to treat technical professionals with required stuffs.

How To Fix Bad Image Quality in Blogger

How To Fix Bad Image Quality in Blogger

I have been with this issue for a longtime but I never minded it, I thought Google automatically compress the images that are being uploaded to picasa web album via blogger and images from Google plus. This is something we do not notice or we don't care but it looks really ugly when some cover images are in bad quality.

So fixing is not big deal, all you got to do is make sure you are logged into your Google account that you use Blogger, then go to your Google + profile( example : +Mohamed Shimran ) from the left sidebar menu select settings , in settings page scroll down until you reach Photos and Videos :

How To Fix Bad Image Quality in Blogger

Now you can see a sub section name Auto Enhance, that's the option/feature that reduces your image quality. In default it is set to Normal so just tick off then your changes will be saved automatically.

How To Fix Bad Image Quality in Blogger

Congratulations, now your problem has been solved. Please leave your comments and share this useful article on your social networks.

How To Install WeChat on iPhone 3G [iOS 4.1 / iOS 4.2.1]

How To Install WeChat on iPhone 3G [iOS 4.1 / iOS 4.2.1]

If you go to AppStore and search for WeChat you won't be able to install WeChat on your iPhone 3G, I found an supporting version for iPhone 3G. In order to install WeChat from your computer download iTools or iFunBox( I recommend iFunBox ). Download WeChat from this link, It's a .rar so extract the ipa file into your desktop or somewhere else and make sure you have connected your iPhone 3g to your computer..

If you have downloaded iTools then run it, in Library tab click on Application sub tab. Now click add and select the ipa file you just extracted from the .rar file you downloaded.

iTools 2013 - WeChat

Then click install, it will take about 2-3 minutes to install. If we chat was installed successfully the blue color button Install would be yellow in color and the text would be Installed.

iTools 2013 - iPhone 3G - WeChat - iOS 4.1
if you have downloaded iFunBox, go to iFunBox Classic under connected devices you can see your iDevice, click User Applications then inside the User Applications right click and select Install or click on Install from the button you see on the top and select the ipa file you just extracted from the .rar you downloaded.

iFunBox - User Applications - Install - WeChat - iPhone 3G
It will begin installing(you will be shown a progressbar and the value is set for installation process). After the installation you will be shown a page where you can make sure the app was installed or not.

iFunBox - Installation - Successful - Failed

So after installing it, you will find it on your App menu.

iPhone 3G - App Menu - WeChat


So go ahead and launch it, if you already have an account you can just log in and if you don't you can sign up.

iPhone 3G - App Menu - WeChat


That's it. Now you have WeChat on your iPhone 3G. This WeChat version works on all devices that runs iOS 3.0 +. Please share this on your social networks and helps others.

How To Make Videos Responsive with CSS

How To Make Videos Responsive with CSS

A responsive website means It will respond to your browser sizes or I can browser stretches. The basic idea of it is to give optimal viewing experience to visitors, nowadays you will rarely see a unresponsive website. If you remember a Jquery snippet I posted about detecting browser real time size It is also responsive. So basically in order to make websites responsive on load you need a meta tag that helps you to stretch/resize the elements of your website but It's not required for this tutorial.

So for this tutorial, only videos with iframe, embed or objects works. You can get the iframe code of any videos from popular websites like YouTube, DailyMotion, Vimeo, MetaCafe etc.

Let's make our style, here's the css we need(if you are a beginner make sure you put the codes within <style>) :

 .Responsive-Video {
    position: relative;
    padding-bottom: 56.25%;
    padding-top: 30px;
    height: 0;
    overflow:
    hidden;
}
   
.Responsive-Video iframe, .Responsive-Video object, .Responsive-Video embed {
    position: absolute;
    top: 0;
    left: 0;
    width: 100%;
    height: 100%;
}


So after adding the css to your web page, add your video embed code within the div class given below(I know this is NOOB! )  :

<div class="Responsive-Video">

    </div>


Example :

<div class="Responsive-Video">
    <iframe width="760" height="720" src="http://www.youtube.com/embed/Mu4ARzSZOmg" frameborder="0" allowfullscreen></iframe>
    </div>


Screenshot : 

YouTube Responsive Video

If you're using Blogger or Wordpress you can just add the css code within the body and whenever you post a video in your post you can add the embed code within the div class.

How to Validate Email in JavaScript with Regular Expression

JavaScript Email Validate
We have seen many Regular Expression tutorials in VB.NET and C-sharp, this is our first JavaScript tutorial on Regular Expressions. So today we’ll see how to validate an email address that's being entered to a textbox. We have a textbox and a button, when you enter something into the textbox and click on the “validate”  button it’ll tell if It’s an email address or not(being noob GRRR!).

Add our JavaScript first(make sure you add it to the head) :

Next add the input box and the validate button :


That’s all. You can use this for some kind of subscription button or register/login forms. I hope this little snippet is helpful for you.

How To Target Mozilla FireFox With CSS

How To Target Mozilla FireFox With CSS

Every web designer/developer knows about CSS rules even beginners know it so in this we are using as rule that targets only Mozilla FireFox. What I mean with targeting is, It's like the the style under this rule will only work on Mozilla FireFox. This rule is really useful because we can define what to show and what not to show. You can also target for Google Chrome and Safari I will write about it another time.

Code 


As you see in the code the H1 and H2 styles have been modified and that targets Mozilla Firefox(@-moz-document url-prefix()). So likewise you can add any style that you want to show up only with Mozilla Firefox.

How To Make a Line Break/New Line in Java

How To Make a Line Break/New Line in Java
Line Break or New Line : I hope you understand what it is, in HTML you use <br> tag to make a new line so in Java if you want to make a new line it's not that hard but it has several methods depends on the platform.

Coming to the point, most of the java beginners think this is the one and only way to make a new line : System.out.println("\n"); but It's not true.. let me tell you something you might think that whatever you program using java will work on other java supported platforms, YES! they will work on other platforms but there are few things that has to be changed in order to get the functions work.. for example this tutorial; this line of code : System.out.println("\n"); would make a new line only on Windows. As I said before there are few things that are different from platform to platforms.

If you want to make a new line on Mac you must use this : System.out.println("\r"); and for Linux you have to use this : System.out.println("\r\n");. So I came up with something that works on all the platforms, It's pretty simple and works perfectly.

First you need to make a public string and set the value to make a new line(You can also just make normal string and set the value)
Add this line of code before your main event
public static String breakline = System.getProperty("line.separator");

Whenever you need to make a new line just use this line of code 
You can add this wherever you want to
System.out.println(breakline);

Please comment if you have any doubts..!

How To Get Response Headers From a HTTP Request in Java

With this Java program you can get the the response headers from a HTTP request. You may have seen HTTP headers in Google Chrome/Mozilla Firefox network feature in inspect element (it just automatically captures HTTP).

All you have to do is run the program from command-line or on eclipse (or any IDE you want), after executing the program you will be asked to enter an URL to get the response headers from HTTP request (Note : make sure you don't enter URL's without 'http://'). Within seconds you will get the HTTP request response headers one after the next line.

This program has 7 namespaces, of course you need them in order to compile/execute the program
import java.util.Scanner;
import java.net.URL;
import java.net.URLConnection;
import java.util.Iterator;
import java.util.List;
import java.util.Map;
import java.util.Set;

and we are using a public string that helps to make a line break
public static String BR = System.getProperty("line.separator");

Okay let me put all the parts together, it uses Scanner(that to get the users input), Map, List, Set, Iterator, a while loop, String Builder and finally it prints.

Program Source Code
import java.util.Scanner;
import java.net.URL;
import java.net.URLConnection;
import java.util.Iterator;
import java.util.List;
import java.util.Map;
import java.util.Set;

/* 
Author : Mohamed Shimran
Description : Getting Response Headers From a HTTP Request
Blog : http://ultimateprogrammingtutorials.info
Facebook : http://fb.me/54j33dh4
Twitter : http://twitter.com/54j33dh4
 */
 
public class httpRequest {
public static String BR = System.getProperty("line.separator");
public static void main(String[] args) throws Exception {

  String Link;
     Scanner in = new Scanner(System. in );
     System.out.println("Enter Link To Get Response Headers From HTTP Request :");
     Link = in .nextLine();
   
System.out.println(BR);

 URL url = new URL(Link);
 URLConnection conn = url.openConnection();
 
 Map> HF = conn.getHeaderFields();
 Set HFS = HF.keySet();
 Iterator HFI = HFS.iterator();
 
 while (HFI.hasNext()) {

      String HFK = HFI.next();
      List HFV = HF.get(HFK);

      StringBuilder strbld = new StringBuilder();
      for (String value : HFV) {
   strbld.append(value);
   strbld.append("");
   }
      System.out.println(HFK + "=" + strbld.toString());
   }
   }
}

Process
javac httpRequest.java

java httpRequest
Enter Link To Get Response Headers From HTTP Request :
http://www.ultimateprogrammingtutorials.info

null=HTTP/1.1 200 OK
ETag="5064ad83-05c5-4cef-bbba-a3030b0727da"
Transfer-Encoding=chunked
Date=Wed, 15 Jan 2014 14:12:06 GMT
X-XSS-Protection=1; mode=block
Expires=Wed, 15 Jan 2014 14:12:06 GMT
Alternate-Protocol=80:quic,80:quic
Last-Modified=Wed, 15 Jan 2014 14:10:59 GMT
Content-Type=text/html; charset=UTF-8
Server=GSE
X-Content-Type-Options=nosniff
Cache-Control=private, max-age=0


How To Get Response Headers From a HTTP Request in Java

Final Words
What can I say? It's just another simple java program by me(of course got help from many resources). I hope you really like it or found it useful, share it if it deserves and PEACE!.

How To Read A Text File Hosted Online To A String

 How To Read A TXT File Hosted Online To A String
So I got a email asking how to do this, I haven't done this before so went through some Google searches and found how to do this. It was pretty easy. I'll just share the code here maybe it'll be useful for someone.

You need these namespaces :
Imports System.IO
Imports System.Net

Event :
Dim TXT As String = "http://www.ultimateprogrammingtutorials.info/robots.txt"
Dim WC As WebClient = New WebClient()
Dim Read As StreamReader = New StreamReader(WC.OpenRead(TXT))
Dim STR As String = Read.ReadToEnd
TextBox1.Text = STR

  • Replace the TXT string value with your .txt link. 
  • You can also write into a richtextbox or whatever you want(I used textbox1 for example) 
I hope you learned something from this snippet.

How To Draw A Circle Form In C#

 How To Draw A Circle Form In C#
I have seen some controls/components that can change the form into circle.. today I came up with something very simple umm well, it’s done with drawing. You’ll need to add the namespace : using System.Drawing;. We’ll do the drawing in form_load if you want you can do it under a button_click event or something else..

This is the code :

System.Drawing.Drawing2D.GraphicsPath XY = new System.Drawing.Drawing2D.GraphicsPath();
            XY.AddEllipse(0, 0, 300, 300);
            this.Region = new Region(XY);

GraphicsPath() : Initialize a new Graphics Path.
AddEllipse() : Adds a Ellipse to the Graphics Path.
new Region() : Describes a Graphics Shape.

How To Login To Instagram Using The API In VB.NET

instagram picture
Instagram is a photo and video sharing app for smartphones, we can call it a social network. As I said It's a smartphone app but you can view photos, like photos, comment on photos and follow/unfollow users via their website from computer also there are more than 10 popular websites where you can view photos, like photos, comment on photos and follow/unfollow users, browse hashtags and view stats they use the API to do the works.

Without much talk let's get into it..

Remember you're just going to make a Instagram Login, you won't be able to view photos or do anything. You need two textbox and a button you can also add two labels to make it look good. The textbox1 is for username and textbox2 is for password.

Instagram Login form preview

Time for some codes...

Required Namespaces :
Imports System.IO
Imports System.Net
Imports System.Text

Functions(We need two functions) :
  
 Dim CC As New CookieContainer
    Dim RQ As HttpWebRequest
    Dim RP As HttpWebResponse
    Public Function GetResponse(ByVal url As String, ByVal referer As String) As String
        RQ = CType(HttpWebRequest.Create(url), HttpWebRequest)
        RQ.CookieContainer = CC

        If referer <> "" Then
            RQ.Referer = referer
        End If

        RP = CType(RQ.GetResponse(), HttpWebResponse)

        Return New StreamReader(RP.GetResponseStream()).ReadToEnd()
    End Function

    Public Function GetResponse(ByVal url As String, ByVal post As String, ByVal referer As String) As String
        RQ = CType(HttpWebRequest.Create(url), HttpWebRequest)
        RQ.Method = "POST"
        RQ.CookieContainer = CC
        RQ.UserAgent = "AppleWebKit/537.36 (KHTML, like Gecko) Mozilla/5.0 (Windows NT 6.1) Chrome/28.0.1468.0 Safari/537.36"

        If referer <> "" Then
            RQ.Referer = referer
        End If

        Dim byteArr() As Byte = Encoding.Default.GetBytes(post)
        RQ.ContentLength = byteArr.Length

        Dim dataStream As Stream = RQ.GetRequestStream()
        dataStream.Write(byteArr, 0, byteArr.Length)

        RP = CType(RQ.GetResponse(), HttpWebResponse)

        Return New StreamReader(RP.GetResponseStream()).ReadToEnd()
    End Function

This code is for your login button :
Dim html As String = GetResponse("https://instagram.com/accounts/login/", "")
        Dim token As String = html.Substring(html.IndexOf("csrfmiddlewaretoken")).Split(""""c)(2)
        Dim username As String = TextBox1.Text
        Dim password As String = TextBox2.Text

        Dim S_B As New StringBuilder
        S_B.Append("csrfmiddlewaretoken=" & token)
        S_B.Append("&username=" & username)
        S_B.Append("&password=" & password)

        html = GetResponse("https://instagram.com/accounts/login/", S_B.ToString, "https://instagram.com/accounts/login/")

        If html.Contains("""username"":""" & username) Then
            MsgBox("Successfully Logged In", MessageBoxIcon.Information)
        ElseIf html.Contains("Please enter a correct username and password.") Then
            MsgBox("Invalid Username or Password", MessageBoxIcon.Error)
        Else
            MsgBox("Unable Login Error", MessageBoxIcon.Error)
        End If


Now run the program and test it..

If you enter correct login credentials you will get this message :

How To Login To Instagram Using The API In VB.NET

I am looking to develop a Instagram picture view if everything goes well I will let you all know. Follow me on Instagram @54j33dh4.

How To Detect Real Time Browser Size In JQuery

This JQuery script detects the dimensions of browser's size onload and resize...

Add these in your head :


Add the styles(not so important) :


Add these to your body :


Now just save the document and run in your browser :)

How To Detect Browser Size Using JQuery

All the credits goes to Michael(mikethedj4)

How To Get Environment Variables In VB.NET and C#


Environment
Environment Variables are set of values that are used for running special processes or special system files.. for example when you install java or python you must make a new environment variable in order to compile and run java or python programs that's all I know about it. Without wasting anytime let's get into it...

This is a simple code that will show you the environment variables..

For VB.NET

        Dim EV As String = Environment.GetEnvironmentVariable("PATH", EnvironmentVariableTarget.Process Or EnvironmentVariableTarget.Machine)

        MsgBox(EV)

For C#

'you must add these namespaces 

using System;
using System.IO;
using System.Windows.Forms;
using Microsoft.Win32;

'add this code in an event 
string EV = Environment.GetEnvironmentVariable("PATH", 
                EnvironmentVariableTarget.Process | 
                EnvironmentVariableTarget.Machine);
            MessageBox.Show(EV);

The "PATH" defines the environment variable name so if you want to get another ones just change PATH with the variable name.

How To Get The MD5 Hash Of A File In VB.NET

MD5 UPTUTORIALS
MD5 is a widely used cryptographic algorithm that produces a 128-BIT hash value. I think all the files you have in your computer has a unique md5 hash.. in some virus scanning process the files get identified easily with the hash value. Today we are going to make a simple application that will help you to get the md5 hash of any file.

Start a new project and do the traditions lol.. you must add a button, a label and a textbox.

user interface :)

You must add these namespaces before you could do any coding :

Imports System.Security.Cryptography
Imports System.IO
Imports System.Text

Here's the code for the application it's all under button click event.. I have explained the basic things by small comments.

  'creating the openfiledialog
        Dim Open As OpenFileDialog = New OpenFileDialog
        Open.Filter = "All Files (*.*)|*.*"
        If (Open.ShowDialog() = DialogResult.OK) Then TextBox1.Text = Open.FileName
        If Open.FileName = "" Then Exit Sub

        'accessing file & getting the hash
        Dim RD As FileStream = New FileStream(TextBox1.Text, FileMode.Open, FileAccess.Read, FileShare.Read, 8192)
        RD = New FileStream(TextBox1.Text, FileMode.Open, FileAccess.Read, FileShare.Read, 8192)
        Dim md5 As MD5CryptoServiceProvider = New MD5CryptoServiceProvider
        md5.ComputeHash(RD)
        RD.Close()

        'converting the bytes into string
        Dim hash As Byte() = md5.Hash
        Dim SB As StringBuilder = New StringBuilder
        Dim HB As Byte
        For Each HB In hash
            SB.Append(String.Format("{0:X1}", HB))
        Next
        LabelHash.Text = "MD5 : " & SB.ToString()

The usage is pretty easy all you have to do is select and load the file from the button and you will get the Md5 hash for the selected file in the Label.