How to Make a WIFI Hotspot Creator in VB.NET


You'll find many programs on the internet that can turn your Computer/Laptop Internet into a WIFI Hotspot but this ain't no any advanced like this. This is a very simple program to make a WIFI Hotspot using the Netsh command line scripting utility that comes with Windows.

Let's get into it...
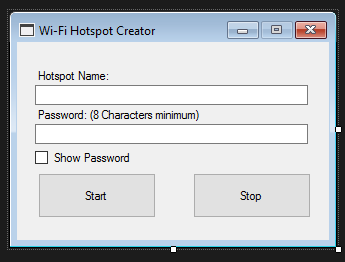
Tools Required
  • 2 Textboxes
  • 2 Labels
  • 1 Checkbox
  • 2 Buttons
Change TEXT in the added Tools like given below
  • Label 1 - Hotspot Name:
  • Label 2 - Password: (8 Characters minimum)
  • CheckBox1 - Show Password
  • Button1 - Start
  • Button2 - Stop
Make sure your FORM looks like this :


Double click your Form to get into Form_Load Event and add this code to disable the Button2 (Stop)
 Button2.Enabled = False
Add this code for FormClosed Event to stop the Hotspot automatically when you close the program
Process.Start("CMD", "/C netsh wlan stop hostednetwork")
  Now go to Button1_Click and add these :

   Try  
       If TextBox1.Text = "" Then  
         MsgBox("Hotspot Name can't be empty", MsgBoxStyle.Critical)  
       End If  
       If TextBox2.TextLength < 8 Then  
         MsgBox("Password should be 8+ characters", MsgBoxStyle.Critical)  
         If TextBox2.Text = "" Then  
           MsgBox("Password can't be empty", MsgBoxStyle.Critical)  
         End If  
       Else  
         Dim process As New Process()  
         process.StartInfo.Verb = "runas"  
         process.StartInfo.UseShellExecute = True  
         process.Start("cmd", String.Format("/c {0} & {1} & {2}", "netsh wlan set hostednetwork mode=allow ssid=" & TextBox1.Text & " key=" & TextBox2.Text, "netsh wlan start hostednetwork", "pause"))  
         MsgBox("Hotspot started successfully", MsgBoxStyle.Information)  
         Button1.Enabled = False  
         Button2.Enabled = True  
       End If  
     Catch ex As Exception  
       MsgBox("Failed to establish a hotspot" & ex.Message, MsgBoxStyle.Information)  
     End Try  

Add this to Button2_Click :

   Button2.Enabled = False  
     Process.Start("CMD", "/C netsh wlan stop hostednetwork")  
     Button1.Enabled = True  
     MsgBox("Hotspot stopped successfully", MsgBoxStyle.Information)  

Finally just go add this piece of code to CheckBox1_Checked :

     If CheckBox1.CheckState = CheckState.Checked Then  
       TextBox2.UseSystemPasswordChar = False  
     End If  
     If CheckBox1.CheckState = CheckState.Unchecked Then  
       TextBox2.UseSystemPasswordChar = True  
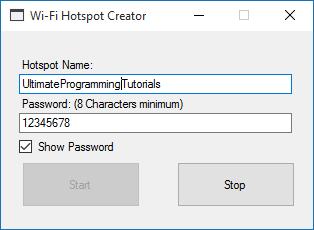
     End If  

That's it! let's Run the program, Just set a Hotspot Name and a Password then click on Start


Now check your Phone or any other devices for WIFI connections, this is a screenshot from my Phone :


Hope it works fine with y'all...

Windows Data Recovery Using Linux


Linux Windowshard drive failure, find deleted files, undelete, deleted files, undelete software, windows xp, free undelete software, undelete plus, installing windows, how to find deleted files, unformat hard drive, install windows vista, unerase, hdd repair, datarecovery.com, xp operating system, datarecovery, hard drive rescue, lost data, rescue hard drive  linux, windows, data, data recovery, recovery, anderson windows, house windows, window, andersen windows, new windows, marvin windows, replacement, undelete files, energy efficient windows, fedora, redhat, restore deleted files, renewal by anderson, recover, unix
We've all been there. We've used the same hard drive for more than 5 years until it suddenly decided to give out. Was it a virus? Was it a mechanical problem? You don't know. And you don't care because you're too angry. All those songs, all those picture collections and wallpapers you'd downloaded are gone! You've made a backup for some of them, of course, but not all. And who knows how old the DVDs are and if they will run properly. Ah, darn it! If only there was a way to recover the data from the dying hard drive...

Oh, wait, there is! There are many Linux distributions you can use in order to deal with this problem. Lucky for you, most Linux distributions have a live CD and can be used to recover the data. There are even distributions created specifically for the job, such as SystemRescueCD. This is the A-Team of operating systems. When you have a problem; when there is no way to solve it; when there is no one else to turn to and if you can operate SystemRescueCD, then you can use it. Don't worry about it, it's not that difficult. Although most Windows users faint at even the thought of using Linux, and even more so when they see the text-based user interface, like I said it's not that difficult to deal with the issue.

SystemRescueCD

SystemRescueCD is based on Gentoo Linux and uses the Xfce user interface (the same as Xubuntu, for example). Don't get too excited, though. Even though the OS has an GUI, that doesn't mean that you will be using a lot of it. In fact, you will mostly be typing commands in the terminal. But don't despair – you won't get lost (hopefully).

Even though it looks like your garden variety operating system, it's actually designed for data recovery alone. You can't use it as your only OS. This is what makes it perfect for the task of recovering your data from the hard drive. Since you don't know what the reason is for the hard drive's demise, if it's a virus and you use a Windows based system for recovery, you might end up destroying the recovery system as well. This is your best bet

Data Recovery

When you first boot SystemRescueCD, type startx in the shell to launch the GUI. After that, insert the recovery USB flash drive. It's important that the flash drive has enough memory to hold all the data you wish to extract and also to be formatted in the NTFS file format. FAT32 is just bad and if you have large files, you really won't have a good time with it.

After you've inserted the proper flash drive, type blkid -o list so the system identifies the drives. Next, use the command ntfs-3d in order to mount the NTFS partitions (the command is mount in case you were too stubborn and insisted on using FAT32 format). Then type ls/mnt to display the directories to be mounted. The commands ntfs-3d/dev/sdb1 /mnt/backupto mount the recovery USB in the directory and ntfs-3d/dev/sda2 /mnt/windows mounts the partition you want to recover.

After you've mounted both the partition you want to recover and the USB drive to the directories, you are free to copy the data. You can do that either by using the cp command or by using the GUI of SystemRescueCD. In the bottom there is a folder-looking icon that has e2 written on it. It will open the emeFM2 file system and enable you to copy the information using the GUI. It's pretty straightforward from there. Navigate to the directories and choose the data you would like to recover. After doing recovering the data, close the file manager and type the command shutdown -h now. This will shut down SystemRescueCD. If all went according to plan, you will have saved your data successfully. Now all you have to do is format your hard drive and install a fresh Windows (if it was a software problem) or replace the hard drive altogether. The important part is that you managed to save your data.