How to Make Excel Spreadsheets [.XLS &.XLSX] in C#

How to Make Excel Spreadsheets [.XLS &.XLSX] in C#

There's a library called ExcelLibrary. It's a free, open source library posted on Google Code. It's very simple, small and easy to use. Plus it has a DataSetHelper that lets you use DataSets and DataTables to easily work with Excel data.

ExcelLibrary seems to still only work for the older Excel format (.xls files), but may be adding support in the future for newer 2007/2010 formats. You can also use EPPlus, which works only for Excel 2007/2010 format files (.xlsx files).

Here are a couple links for quick reference:
ExcelLibrary - GNU Lesser GPL
EPPlus - GNU Library General Public License (LGPL)

Here's some example code for ExcelLibrary:

//create new xls file
string file = "C:\\newdoc.xls";
Workbook workbook = new Workbook();
Worksheet worksheet = new Worksheet("First Sheet");
worksheet.Cells[0, 1] = new Cell((short)1);
worksheet.Cells[2, 0] = new Cell(9999999);
worksheet.Cells[3, 3] = new Cell((decimal)3.45);
worksheet.Cells[2, 2] = new Cell("Text string");
worksheet.Cells[2, 4] = new Cell("Second string");
worksheet.Cells[4, 0] = new Cell(32764.5, "#,##0.00");
worksheet.Cells[5, 1] = new Cell(DateTime.Now, @"YYYY\-MM\-DD");
worksheet.Cells.ColumnWidth[0, 1] = 3000;
workbook.Worksheets.Add(worksheet);
workbook.Save(file);

// open xls file
Workbook book = Workbook.Load(file);
Worksheet sheet = book.Worksheets[0];

 // traverse cells
 foreach (Pair<Pair<int, int>, Cell> cell in sheet.Cells)
 {
     dgvCells[cell.Left.Right, cell.Left.Left].Value = cell.Right.Value;
 }

 // traverse rows by Index
 for (int rowIndex = sheet.Cells.FirstRowIndex;
        rowIndex <= sheet.Cells.LastRowIndex; rowIndex++)
 {
     Row row = sheet.Cells.GetRow(rowIndex);
     for (int colIndex = row.FirstColIndex;
        colIndex <= row.LastColIndex; colIndex++)
     {
         Cell cell = row.GetCell(colIndex);
     }
 }

Creating the Excel file is as easy as that. You can also manually create Excel files, but the above functionality is what really impressed me.

Credits : Mike Webb

Infolinks Review with Payment Proof 2017 | Best Adsense Alternative


Infolinks is a global advertising platform offering ad solutions for both publishers and advertisers. Online advertisers utilize the Infolinks Self-Serve Marketplace to customize their own campaign. Advertising with Infolinks means delivering brand messages to engaged users.

Online bloggers and website owners monetize their websites with Infolinks while keeping the Look & feel of their sites undisturbed.

Ad Types they Offer :

InArticle – Targets only your search traffic with ads relevant to their searched terms in non-disruptive footer ads. InFold adds navigational value and another SEO layer to your site while delivering ads pertaining to exactly what your search traffic is looking for.


InFold – Targets only your search traffic with ads relevant to their searched terms in non-disruptive footer ads. InFold adds navigational value and another SEO layer to your site while delivering ads pertaining to exactly what your search traffic is looking for.

InText – Double underline your best keywords to monetize your written content. A simple hover of a mouse opens an ad bubble containing an ad matched to the context of your keywords. Fully customize the look and volume of InText ads on your website pages.


InFrame – Attractive skyscraper display banners placed in the extra real estate in the margins of widescreen monitors only. These ads are matched to your website’s category and are intelligently revealed only on traffic originating from wide screen monitors and customized to fit perfectly, without disturbing your site’s layout at all.


InScreen– an interstitial ad, functions as an ‘ad intermission’ between page views. This results in well-timed display ads, driven both by user intent and website content. InScreen can be activated by three different triggers: When a user enters your site, when a user switches from one page to another inside your site and when a user leaves your site via an external link.

InTag – Presents a range of keywords relevant to the context of your site. Choose between one or two rows of links that open a relevant ad bubble upon a mouse hover. InTag manages to capture a spectrum of users’ interests and invite engagement with its range of keywords.
 

Infolinks Referral Program

Like other CPC companies, Infolinks also has a referral program. Refer new publishers to Infolinks and earn 10% of their revenue for 12 months. You can join the referral program from their Referral page. They will provide you with a Referral Link and Banners.

http://www.infolinks.com/join-us?aid=1030343

Infolinks Payment Options

  • Paypal – $50
  • eCheck – $50
  • ACH (Only for U.S. Bank Accounts)- $50
  • Payoneer – $50
  • Bank Wire Transfer – $100
  • Western Union – $100
They will send the payment within 45 days of the end of the month in which you reached the threshold.

Infolinks Payment Proof

Infolinks is a legit site, I have my payment proof. I got paid $232.78 via Wire Transfer within 35 days of the end of the month.
Here's the Picture of Wire Transfer Receipt from my Bank :

Infolinks Wire Transfer Proof Receipt - Ultimate Programming Tutorials

Infolinks Customer Support

Infolinks Customer Service  has been very good so far. Whenever I contacted them via email the  response was within 24 hours.
  

Final Thoughts

There are many ways to make money blogging, Infolinks still can be considered as one of the easiest ways. Making money from Infolinks is really easy and does not require any special skill, even a new blogger can make money by increasing website traffic.

Reference : Infolinks

How to Send SMS in C# Using GSM Modem/Dongle


How to Send SMS in C# Using GSM Modem/Dongle
This is a very simple method to send SMS via GSM Modem so without much explanations let's get into it.

Thing's you'll need :
  • GSM Modem with a SIM
  • Libraries :
    GSMCommServer.dll
    GSMCommShared.dll
    GSMCommunication.dll
    PDUConverter.dll
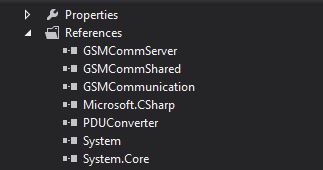
If you've installed the Modem software you'll be able find all the libraries needed. Just go to add Reference and add the mentioned libraries (without them this program won't work).

How to Send SMS in C# Using GSM Modem/Dongle

Now go to your form and add control as given below
  • 4 Labels :
    Label1 - Message Body :
    Label2 - Phone Number :
    Label3 - Port :
    Label4 - Modem Not Connected
  • 2 Textboxes :
    Textbox1 - To Phone Number
    Textbox2 - To Message Body
  • 1 ComboBox :
    Combobox1 - To Port :
  • 2 Buttons
    Button1 - Send
    Button2 - Connect
 Arrange your form like this :

How to Send SMS in C# Using GSM Modem/Dongle

 Now let's go to the coding

Namespaces :
 using GsmComm.GsmCommunication;  
 using GsmComm.PduConverter;  
 using GsmComm.Server;  

Add this above Public Form1 :

 private GsmCommMain comm;  

Form1_Load :
 Combobox1.Items.Add("COM1");  
 Combobox1.Items.Add("COM2");  
 Combobox1.Items.Add("COM3");  
 Combobox1.Items.Add("COM4");  
 Combobox1.Items.Add("COM5");  

Button2_Click :
 if (Combobox1.Text == "")  
       {  
         MessageBox.Show("Invalid Port Name");  
         return;  
       }  
       comm = new GsmCommMain(Combobox1.Text, 9600, 150);  
       Cursor.Current = Cursors.Default;  
       bool retry;  
       do  
       {  
         retry = false;  
         try  
         {  
           Cursor.Current = Cursors.WaitCursor;  
           comm.Open();  
           MessageBox.Show("Modem Connected Sucessfully");  
           Button2.Enabled = false;  
           label4.Text = "Modem is connected";  
         }  
         catch (Exception)  
         {  
           Cursor.Current = Cursors.Default;  
           if (MessageBox.Show(this, "GSM Modem is not available", "Check",  
             MessageBoxButtons.RetryCancel, MessageBoxIcon.Warning) == DialogResult.Retry)  
             retry = true;  
           else  
           { return; }  
         }  
       }  
       while (retry);  

Button1_Click :
 try  
       {  
         Cursor.Current = Cursors.WaitCursor;  
         SmsSubmitPdu pdu;  
           Cursor.Current = Cursors.Default;  
           byte dcs = (byte)DataCodingScheme.GeneralCoding.Alpha7BitDefault;  
           pdu = new SmsSubmitPdu(Textbox2.Text, Textbox1.Text);  
           int times = 1;  
           for (int i = 0; i < times; i++)  
           {  
             comm.SendMessage(pdu);  
           }  
         MessageBox.Show("Message Sent Succesfully","Success",MessageBoxButtons.OK,MessageBoxIcon.Information);  
       }  
       catch(Exception ex)  
       {  
         MessageBox.Show(ex.Message.ToString());  
       }  

That's all, Do share your comments.


Credits : Rotich

Circle Progress Bar Control for VB.NET

Add a new User Control and add these codes in it :

   Dim _Myrr As Integer  
   Public Property rr As Integer  
     Set(value As Integer)  
       _Myrr = value  
     End Set  
     Get  
       Return _Myrr  
     End Get  
   End Property  
   Private Sub DrawProgress(g As Graphics, rect As Rectangle, percentage As Single)  
     'work out the angles for each arc  
     Dim progressAngle = CSng(360 / 100 * percentage)  
     Dim remainderAngle = 360 - progressAngle  
     'create pens to use for the arcs  
     Using progressPen As New Pen(Color.LightSeaGreen, 2), remainderPen As New Pen(Color.LightGray, 2)  
       'set the smoothing to high quality for better output  
       g.SmoothingMode = Drawing2D.SmoothingMode.AntiAlias  
       'draw the blue and white arcs  
       g.DrawArc(progressPen, rect, -90, progressAngle)  
       g.DrawArc(remainderPen, rect, progressAngle - 90, remainderAngle)  
     End Using  
     'draw the text in the centre by working out how big it is and adjusting the co-ordinates accordingly  
     Using fnt As New Font(Me.Font.FontFamily, 14)  
       Dim text As String = percentage.ToString + "%"  
       Dim textSize = g.MeasureString(text, fnt)  
       Dim textPoint As New Point(CInt(rect.Left + (rect.Width / 2) - (textSize.Width / 2)), CInt(rect.Top + (rect.Height / 2) - (textSize.Height / 2)))  
       'now we have all the values draw the text  
       g.DrawString(text, fnt, Brushes.Black, textPoint)  
     End Using  
   End Sub  
   Private Sub UserControl1_Paint(sender As Object, e As PaintEventArgs) Handles Me.Paint  
     DrawProgress(e.Graphics, New Rectangle(5, 5, 60, 60), _Myrr)  
   End Sub  

Don't forget to add these two namespaces :

 Imports System.Drawing  
 Imports System.Windows.Forms  

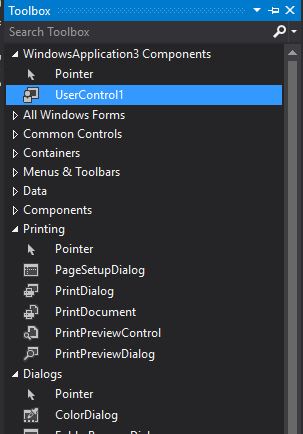
 Now Build your project and then check your ToolBox you'll see a new Tool

That's our Circle Progress Bar!
Now add our Progress Bar, a Timer and a Button.

Timer1_Tick Code :

     If UPT >= 100 Then  
       UPT = 0  
     Else  
       UPT = UPT + 1  
     End If  
     UserControl11.rr = UPT  
     UserControl11.Invalidate()  
     UserControl11.Update()  
     UserControl11.Refresh()  

Button1_Click Code :

   Timer1.Enabled = True  

Under Public Class add this Integer

   Public UPT As Integer  

That's it, it should work fine now...


This is just an example of a Circle Progress Bar I found online, do comment your suggestions.