Infolinks Review with Payment Proof 2017 | Best Adsense Alternative


Infolinks is a global advertising platform offering ad solutions for both publishers and advertisers. Online advertisers utilize the Infolinks Self-Serve Marketplace to customize their own campaign. Advertising with Infolinks means delivering brand messages to engaged users.

Online bloggers and website owners monetize their websites with Infolinks while keeping the Look & feel of their sites undisturbed.

Ad Types they Offer :

InArticle – Targets only your search traffic with ads relevant to their searched terms in non-disruptive footer ads. InFold adds navigational value and another SEO layer to your site while delivering ads pertaining to exactly what your search traffic is looking for.


InFold – Targets only your search traffic with ads relevant to their searched terms in non-disruptive footer ads. InFold adds navigational value and another SEO layer to your site while delivering ads pertaining to exactly what your search traffic is looking for.

InText – Double underline your best keywords to monetize your written content. A simple hover of a mouse opens an ad bubble containing an ad matched to the context of your keywords. Fully customize the look and volume of InText ads on your website pages.


InFrame – Attractive skyscraper display banners placed in the extra real estate in the margins of widescreen monitors only. These ads are matched to your website’s category and are intelligently revealed only on traffic originating from wide screen monitors and customized to fit perfectly, without disturbing your site’s layout at all.


InScreen– an interstitial ad, functions as an ‘ad intermission’ between page views. This results in well-timed display ads, driven both by user intent and website content. InScreen can be activated by three different triggers: When a user enters your site, when a user switches from one page to another inside your site and when a user leaves your site via an external link.

InTag – Presents a range of keywords relevant to the context of your site. Choose between one or two rows of links that open a relevant ad bubble upon a mouse hover. InTag manages to capture a spectrum of users’ interests and invite engagement with its range of keywords.
 

Infolinks Referral Program

Like other CPC companies, Infolinks also has a referral program. Refer new publishers to Infolinks and earn 10% of their revenue for 12 months. You can join the referral program from their Referral page. They will provide you with a Referral Link and Banners.

http://www.infolinks.com/join-us?aid=1030343

Infolinks Payment Options

  • Paypal – $50
  • eCheck – $50
  • ACH (Only for U.S. Bank Accounts)- $50
  • Payoneer – $50
  • Bank Wire Transfer – $100
  • Western Union – $100
They will send the payment within 45 days of the end of the month in which you reached the threshold.

Infolinks Payment Proof

Infolinks is a legit site, I have my payment proof. I got paid $232.78 via Wire Transfer within 35 days of the end of the month.
Here's the Picture of Wire Transfer Receipt from my Bank :

Infolinks Wire Transfer Proof Receipt - Ultimate Programming Tutorials

Infolinks Customer Support

Infolinks Customer Service  has been very good so far. Whenever I contacted them via email the  response was within 24 hours.
  

Final Thoughts

There are many ways to make money blogging, Infolinks still can be considered as one of the easiest ways. Making money from Infolinks is really easy and does not require any special skill, even a new blogger can make money by increasing website traffic.

Reference : Infolinks

How to Send SMS in C# Using GSM Modem/Dongle


How to Send SMS in C# Using GSM Modem/Dongle
This is a very simple method to send SMS via GSM Modem so without much explanations let's get into it.

Thing's you'll need :
  • GSM Modem with a SIM
  • Libraries :
    GSMCommServer.dll
    GSMCommShared.dll
    GSMCommunication.dll
    PDUConverter.dll
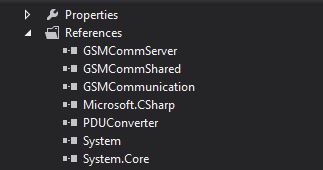
If you've installed the Modem software you'll be able find all the libraries needed. Just go to add Reference and add the mentioned libraries (without them this program won't work).

How to Send SMS in C# Using GSM Modem/Dongle

Now go to your form and add control as given below
  • 4 Labels :
    Label1 - Message Body :
    Label2 - Phone Number :
    Label3 - Port :
    Label4 - Modem Not Connected
  • 2 Textboxes :
    Textbox1 - To Phone Number
    Textbox2 - To Message Body
  • 1 ComboBox :
    Combobox1 - To Port :
  • 2 Buttons
    Button1 - Send
    Button2 - Connect
 Arrange your form like this :

How to Send SMS in C# Using GSM Modem/Dongle

 Now let's go to the coding

Namespaces :
 using GsmComm.GsmCommunication;  
 using GsmComm.PduConverter;  
 using GsmComm.Server;  

Add this above Public Form1 :

 private GsmCommMain comm;  

Form1_Load :
 Combobox1.Items.Add("COM1");  
 Combobox1.Items.Add("COM2");  
 Combobox1.Items.Add("COM3");  
 Combobox1.Items.Add("COM4");  
 Combobox1.Items.Add("COM5");  

Button2_Click :
 if (Combobox1.Text == "")  
       {  
         MessageBox.Show("Invalid Port Name");  
         return;  
       }  
       comm = new GsmCommMain(Combobox1.Text, 9600, 150);  
       Cursor.Current = Cursors.Default;  
       bool retry;  
       do  
       {  
         retry = false;  
         try  
         {  
           Cursor.Current = Cursors.WaitCursor;  
           comm.Open();  
           MessageBox.Show("Modem Connected Sucessfully");  
           Button2.Enabled = false;  
           label4.Text = "Modem is connected";  
         }  
         catch (Exception)  
         {  
           Cursor.Current = Cursors.Default;  
           if (MessageBox.Show(this, "GSM Modem is not available", "Check",  
             MessageBoxButtons.RetryCancel, MessageBoxIcon.Warning) == DialogResult.Retry)  
             retry = true;  
           else  
           { return; }  
         }  
       }  
       while (retry);  

Button1_Click :
 try  
       {  
         Cursor.Current = Cursors.WaitCursor;  
         SmsSubmitPdu pdu;  
           Cursor.Current = Cursors.Default;  
           byte dcs = (byte)DataCodingScheme.GeneralCoding.Alpha7BitDefault;  
           pdu = new SmsSubmitPdu(Textbox2.Text, Textbox1.Text);  
           int times = 1;  
           for (int i = 0; i < times; i++)  
           {  
             comm.SendMessage(pdu);  
           }  
         MessageBox.Show("Message Sent Succesfully","Success",MessageBoxButtons.OK,MessageBoxIcon.Information);  
       }  
       catch(Exception ex)  
       {  
         MessageBox.Show(ex.Message.ToString());  
       }  

That's all, Do share your comments.


Credits : Rotich

Circle Progress Bar Control for VB.NET

Add a new User Control and add these codes in it :

   Dim _Myrr As Integer  
   Public Property rr As Integer  
     Set(value As Integer)  
       _Myrr = value  
     End Set  
     Get  
       Return _Myrr  
     End Get  
   End Property  
   Private Sub DrawProgress(g As Graphics, rect As Rectangle, percentage As Single)  
     'work out the angles for each arc  
     Dim progressAngle = CSng(360 / 100 * percentage)  
     Dim remainderAngle = 360 - progressAngle  
     'create pens to use for the arcs  
     Using progressPen As New Pen(Color.LightSeaGreen, 2), remainderPen As New Pen(Color.LightGray, 2)  
       'set the smoothing to high quality for better output  
       g.SmoothingMode = Drawing2D.SmoothingMode.AntiAlias  
       'draw the blue and white arcs  
       g.DrawArc(progressPen, rect, -90, progressAngle)  
       g.DrawArc(remainderPen, rect, progressAngle - 90, remainderAngle)  
     End Using  
     'draw the text in the centre by working out how big it is and adjusting the co-ordinates accordingly  
     Using fnt As New Font(Me.Font.FontFamily, 14)  
       Dim text As String = percentage.ToString + "%"  
       Dim textSize = g.MeasureString(text, fnt)  
       Dim textPoint As New Point(CInt(rect.Left + (rect.Width / 2) - (textSize.Width / 2)), CInt(rect.Top + (rect.Height / 2) - (textSize.Height / 2)))  
       'now we have all the values draw the text  
       g.DrawString(text, fnt, Brushes.Black, textPoint)  
     End Using  
   End Sub  
   Private Sub UserControl1_Paint(sender As Object, e As PaintEventArgs) Handles Me.Paint  
     DrawProgress(e.Graphics, New Rectangle(5, 5, 60, 60), _Myrr)  
   End Sub  

Don't forget to add these two namespaces :

 Imports System.Drawing  
 Imports System.Windows.Forms  

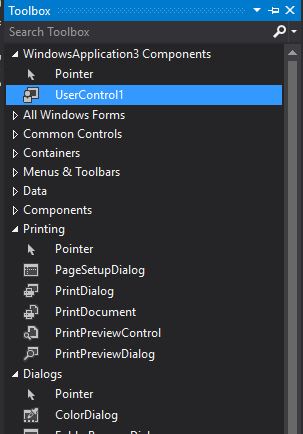
 Now Build your project and then check your ToolBox you'll see a new Tool

That's our Circle Progress Bar!
Now add our Progress Bar, a Timer and a Button.

Timer1_Tick Code :

     If UPT >= 100 Then  
       UPT = 0  
     Else  
       UPT = UPT + 1  
     End If  
     UserControl11.rr = UPT  
     UserControl11.Invalidate()  
     UserControl11.Update()  
     UserControl11.Refresh()  

Button1_Click Code :

   Timer1.Enabled = True  

Under Public Class add this Integer

   Public UPT As Integer  

That's it, it should work fine now...


This is just an example of a Circle Progress Bar I found online, do comment your suggestions.

How to Make Windows / Android / iOS Apps Using Xamarin Platform


Before writing applications, you’ll need to install the Xamarin platform on your Mac,PC, or both (if you’re using that setup)

See the articles on the Xamarin website at:

Creating an iOS App
If you’re interested in using Xamarin.Forms to target the iPhone, first become familiar with the appropriate Getting Started documents on the Xamarin website: 

This will give you guidance on using the Xamarin.iOS library to develop an iPhone application in C#. All you really need to do is get to the point where you can build and deploy a simple iPhone application on either a real iPhone or the iPhone simulator.


If you’re using Visual Studio, and if everything is installed correctly, you should be able to select File > New > Project from the menu, and in the New Project dialog, from the left select Visual C# and iOS and then Universal (which refers to targeting both iPhone and iPad), and from the template list in
the center, select Blank App (iOS).


If you’re using Xamarin Studio, you should be able to select File > New > Solution from the menu, and in the New Project dialog, from the left, select iOS and then App, and from the template list in the center, select Single View App. 


In either case, select a location and name for the solution. Build and deploy the skeleton application created in the project. If you’re having a problem with this, it’s not a Xamarin.Forms issue. You might want to check the Xamarin.iOS forums to see if anybody else has a similar problem: 
http://forums.xamarin.com/categories/ios/ 

Creating an Android App

If you’re interested in using Xamarin.Forms to target Android devices, first become familiar with the Getting Started documents on the Xamarin website: 

https://developer.xamarin.com/guides/android/getting_started/ 


If you’re using Visual Studio, and if everything is installed correctly, you should be able to select File > New > Project from the menu, and in the New Project dialog, from the left, select Visual C# and then Android, and from the template list in the center, select Blank App (Android). 


If you’re using Xamarin Studio, you should be able to select File > New > Solution from the menu, and in the New Project dialog, from the left, select Android and App, and in the template list in the center, select Android App. 


Give it a location and a name; build and deploy. If you can’t get this process to work, it’s not a Xamarin.Forms issue, and you might want to check the Xamarin.Android forums for a similar problem: 


http://forums.xamarin.com/categories/android/ 


Creating a Windows App

If you’re interested in using Xamarin.Forms to target Windows, Windows Phone, or Windows 10 Mobile, you’ll need to become familiar with at least the rudiments of using Visual Studio to develop  Windows applications: 

http://dev.windows.com/ 


In Visual Studio 2017, if everything is installed correctly, you should be able select File > New > Project from the menu, and in the New Project dialog, at the left, select Visual C# and Windows. You’ll see a hierarchy under the Windows heading something like this:


.
The first Universal heading under Windows is for creating a Universal Windows Platform application that can target either Windows 10 or Windows 10 Mobile. Select that, and from the center area select Blank App (Universal Windows) to create a UWP app.  

The other two project types supported by Xamarin.Forms are under the Windows 8 header. The Universal item actually creates two projects—a Windows desktop application and a Windows Phone application with some shared code. For creating just a Windows application, choose Windows and then from the center section Blank App (Windows 8.1). For a Windows Phone application, choose Windows Phone and Blank App This creates a project that targets Windows Phone 8.1. 

These are the three project types supported by Xamarin.Forms.

You should be able to build and deploy the skeleton application to the desktop or to a real phone or an emulator. If not, search the Microsoft website or online forums such as Stack Overflow. 

All ready? If you can build Xamarin.iOS, Xamarin.Android, and Windows applications (or some subset of those), then you’re ready to create your first Xamarin.Forms application. It’s time to say “Hello, Xamarin.Forms” to a new era in cross-platform mobile development. 


Credits : Microsoft Press

How to Get FireFox Theme in VB.NET


Just add a New Class and Copy & Past all these codes in it

 ' Firefox Theme.  
 ' Made by AeroRev9.  
 ' 25/07/2015.  
 ' Updated : 29/07/2015 [2].  
 ' Credits : Mavaamarten, Xertz.  
 Imports System.ComponentModel  
 Imports System.Drawing.Drawing2D  
 Imports System.Drawing.Text  
 Module Theme  
   Public ReadOnly Property GlobalFont(B As FontStyle, S As Integer) As Font  
     Get  
       Return New Font("Segoe UI", S, B)  
     End Get  
   End Property  
   Public Function GetCheckMark() As String  
     Return "iVBORw0KGgoAAAANSUhEUgAAABMAAAAQCAYAAAD0xERiAAAAAXNSR0IArs4c6QAAAARnQU1BAACxjwv8YQUAAAAJcEhZcwAADsMAAA7DAcdvqGQAAAEySURBVDhPY/hPRUBdw/79+/efVHz77bf/X37+wRAn2bDff/7+91l+83/YmtsYBpJs2ITjz/8rTbrwP2Dlrf9XXn5FkSPJsD13P/y3nHsVbNjyy28w5Ik27NWXX//TNt8DG1S19zFWNRiGvfzy8//ccy9RxEB4wvFnYIMMZl7+//brLwx5EEYx7MP33/9dF18Ha1py8RVcHBR7mlMvgsVXX8X0Hgwz/P379z8yLtz5AKxJdcpFcBj9+v3nf/CqW2Cx5E13UdSiYwzDvv36/d9/BUSzzvRL/0t2PQSzQd57+vEHilp0jGEYCJ9+8hnuGhiee+4Vhjp0jNUwEN566/1/m/mQZJC/48H/zz9+YVWHjHEaBsKgwAZ59eH771jl0TFew0D48osvWMWxYYKGEY///gcAqiuA6kEmfEMAAAAASUVORK5CYII="  
   End Function  
 End Module  
 Module Helpers  
   Public Enum MouseState As Byte  
     None = 0  
     Over = 1  
     Down = 2  
   End Enum  
   Public Function FullRectangle(S As Size, Subtract As Boolean) As Rectangle  
     If Subtract Then  
       Return New Rectangle(0, 0, S.Width - 1, S.Height - 1)  
     Else  
       Return New Rectangle(0, 0, S.Width, S.Height)  
     End If  
   End Function  
   Public Function GreyColor(G As UInteger) As Color  
     Return Color.FromArgb(G, G, G)  
   End Function  
   Public Sub CenterString(G As Graphics, T As String, F As Font, C As Color, R As Rectangle)  
     Dim TS As SizeF = G.MeasureString(T, F)  
     Using B As New SolidBrush(C)  
       G.DrawString(T, F, B, New Point(R.Width / 2 - (TS.Width / 2), R.Height / 2 - (TS.Height / 2)))  
     End Using  
   End Sub  
   Public Sub FillRoundRect(G As Graphics, R As Rectangle, Curve As Integer, C As Color)  
     Using B As New SolidBrush(C)  
       G.FillPie(B, R.X, R.Y, Curve, Curve, 180, 90)  
       G.FillPie(B, R.X + R.Width - Curve, R.Y, Curve, Curve, 270, 90)  
       G.FillPie(B, R.X, R.Y + R.Height - Curve, Curve, Curve, 90, 90)  
       G.FillPie(B, R.X + R.Width - Curve, R.Y + R.Height - Curve, Curve, Curve, 0, 90)  
       G.FillRectangle(B, CInt(R.X + Curve / 2), R.Y, R.Width - Curve, CInt(Curve / 2))  
       G.FillRectangle(B, R.X, CInt(R.Y + Curve / 2), R.Width, R.Height - Curve)  
       G.FillRectangle(B, CInt(R.X + Curve / 2), CInt(R.Y + R.Height - Curve / 2), R.Width - Curve, CInt(Curve / 2))  
     End Using  
   End Sub  
   Public Sub DrawRoundRect(G As Graphics, R As Rectangle, Curve As Integer, C As Color)  
     Using P As New Pen(C)  
       G.DrawArc(P, R.X, R.Y, Curve, Curve, 180, 90)  
       G.DrawLine(P, CInt(R.X + Curve / 2), R.Y, CInt(R.X + R.Width - Curve / 2), R.Y)  
       G.DrawArc(P, R.X + R.Width - Curve, R.Y, Curve, Curve, 270, 90)  
       G.DrawLine(P, R.X, CInt(R.Y + Curve / 2), R.X, CInt(R.Y + R.Height - Curve / 2))  
       G.DrawLine(P, CInt(R.X + R.Width), CInt(R.Y + Curve / 2), CInt(R.X + R.Width), CInt(R.Y + R.Height - Curve / 2))  
       G.DrawLine(P, CInt(R.X + Curve / 2), CInt(R.Y + R.Height), CInt(R.X + R.Width - Curve / 2), CInt(R.Y + R.Height))  
       G.DrawArc(P, R.X, R.Y + R.Height - Curve, Curve, Curve, 90, 90)  
       G.DrawArc(P, R.X + R.Width - Curve, R.Y + R.Height - Curve, Curve, Curve, 0, 90)  
     End Using  
   End Sub  
   Public Sub CenterStringTab(G As Graphics, text As String, font As Font, brush As Brush, rect As Rectangle, Optional shadow As Boolean = False, Optional yOffset As Integer = 0)  
     Dim textSize As SizeF = G.MeasureString(text, font)  
     Dim textX As Integer = rect.X + (rect.Width / 2) - (textSize.Width / 2)  
     Dim textY As Integer = rect.Y + (rect.Height / 2) - (textSize.Height / 2) + yOffset  
     If shadow Then G.DrawString(text, font, Brushes.Black, textX + 1, textY + 1)  
     G.DrawString(text, font, brush, textX, textY + 1)  
   End Sub  
 End Module  
 <DefaultEvent("CheckedChanged")>  
 Class FirefoxRadioButton  
   Inherits Control  
 #Region " Public "  
   Public Event CheckedChanged(sender As Object, e As EventArgs)  
 #End Region  
 #Region " Private "  
   Private State As MouseState  
   Private ETC As Color = Nothing  
   Private G As Graphics  
   Private _EnabledCalc As Boolean  
   Private _Checked As Boolean  
   Private _Bold As Boolean  
 #End Region  
 #Region " Properties "  
   Public Property Checked As Boolean  
     Get  
       Return _Checked  
     End Get  
     Set(value As Boolean)  
       _Checked = value  
       Invalidate()  
     End Set  
   End Property  
   Public Shadows Property Enabled As Boolean  
     Get  
       Return EnabledCalc  
     End Get  
     Set(value As Boolean)  
       _EnabledCalc = value  
       Invalidate()  
     End Set  
   End Property  
   <DisplayName("Enabled")>  
   Public Property EnabledCalc As Boolean  
     Get  
       Return _EnabledCalc  
     End Get  
     Set(value As Boolean)  
       Enabled = value  
       Invalidate()  
     End Set  
   End Property  
   Public Property Bold As Boolean  
     Get  
       Return _Bold  
     End Get  
     Set(value As Boolean)  
       _Bold = value  
       Invalidate()  
     End Set  
   End Property  
 #End Region  
 #Region " Control "  
   Sub New()  
     DoubleBuffered = True  
     ForeColor = Color.FromArgb(66, 78, 90)  
     Font = GlobalFont(FontStyle.Regular, 10)  
     Size = New Size(160, 27)  
     Enabled = True  
   End Sub  
   Protected Overrides Sub OnPaint(e As PaintEventArgs)  
     G = e.Graphics  
     G.SmoothingMode = SmoothingMode.HighQuality  
     G.TextRenderingHint = TextRenderingHint.ClearTypeGridFit  
     MyBase.OnPaint(e)  
     G.Clear(Parent.BackColor)  
     If Enabled Then  
       ETC = Color.FromArgb(66, 78, 90)  
       Select Case State  
         Case MouseState.Over, MouseState.Down  
           Using P As New Pen(Color.FromArgb(34, 146, 208))  
             G.DrawEllipse(P, New Rectangle(2, 2, 22, 22))  
           End Using  
         Case Else  
           Using P As New Pen(GreyColor(190))  
             G.DrawEllipse(P, New Rectangle(2, 2, 22, 22))  
           End Using  
       End Select  
       If Checked Then  
         Using B As New SolidBrush(Color.FromArgb(34, 146, 208))  
           G.FillEllipse(B, New Rectangle(7, 7, 12, 12))  
         End Using  
       End If  
     Else  
       ETC = GreyColor(170)  
       Using P As New Pen(GreyColor(210))  
         G.DrawEllipse(P, New Rectangle(2, 2, 22, 22))  
       End Using  
       If Checked Then  
         Using B As New SolidBrush(Color.FromArgb(34, 146, 208))  
           G.FillEllipse(B, New Rectangle(7, 7, 12, 12))  
         End Using  
       End If  
     End If  
     Using B As New SolidBrush(ETC)  
       If Bold Then  
         G.DrawString(Text, GlobalFont(FontStyle.Bold, 10), B, New Point(32, 4))  
       Else  
         G.DrawString(Text, GlobalFont(FontStyle.Regular, 10), B, New Point(32, 4))  
       End If  
     End Using  
   End Sub  
   Protected Overrides Sub OnMouseDown(e As MouseEventArgs)  
     MyBase.OnMouseDown(e)  
     State = MouseState.Down : Invalidate()  
   End Sub  
   Protected Overrides Sub OnMouseUp(e As MouseEventArgs)  
     MyBase.OnMouseUp(e)  
     If Enabled Then  
       If Not Checked Then  
         For Each C As Control In Parent.Controls  
           If TypeOf C Is FirefoxRadioButton Then  
             DirectCast(C, FirefoxRadioButton).Checked = False  
           End If  
         Next  
       End If  
       Checked = True  
       RaiseEvent CheckedChanged(Me, e)  
     End If  
     State = MouseState.Over : Invalidate()  
   End Sub  
   Protected Overrides Sub OnMouseEnter(e As EventArgs)  
     MyBase.OnMouseEnter(e)  
     State = MouseState.Over : Invalidate()  
   End Sub  
   Protected Overrides Sub OnMouseLeave(e As EventArgs)  
     MyBase.OnMouseLeave(e)  
     State = MouseState.None : Invalidate()  
   End Sub  
 #End Region  
 End Class  
 <DefaultEvent("CheckedChanged")>  
 Class FirefoxCheckBox  
   Inherits Control  
 #Region " Public "  
   Public Event CheckedChanged(sender As Object, e As EventArgs)  
 #End Region  
 #Region " Private "  
   Private State As MouseState  
   Private ETC As Color = Nothing  
   Private G As Graphics  
   Private _EnabledCalc As Boolean  
   Private _Checked As Boolean  
   Private _Bold As Boolean  
 #End Region  
 #Region " Properties "  
   Public Property Checked As Boolean  
     Get  
       Return _Checked  
     End Get  
     Set(value As Boolean)  
       _Checked = value  
       Invalidate()  
     End Set  
   End Property  
   Public Shadows Property Enabled As Boolean  
     Get  
       Return EnabledCalc  
     End Get  
     Set(value As Boolean)  
       _EnabledCalc = value  
       Invalidate()  
     End Set  
   End Property  
   <DisplayName("Enabled")>  
   Public Property EnabledCalc As Boolean  
     Get  
       Return _EnabledCalc  
     End Get  
     Set(value As Boolean)  
       Enabled = value  
       Invalidate()  
     End Set  
   End Property  
   Public Property Bold As Boolean  
     Get  
       Return _Bold  
     End Get  
     Set(value As Boolean)  
       _Bold = value  
       Invalidate()  
     End Set  
   End Property  
 #End Region  
 #Region " Control "  
   Sub New()  
     DoubleBuffered = True  
     ForeColor = Color.FromArgb(66, 78, 90)  
     Font = GlobalFont(FontStyle.Regular, 10)  
     Size = New Size(160, 27)  
     Enabled = True  
   End Sub  
   Protected Overrides Sub OnPaint(e As PaintEventArgs)  
     G = e.Graphics  
     G.SmoothingMode = SmoothingMode.HighQuality  
     G.TextRenderingHint = TextRenderingHint.ClearTypeGridFit  
     MyBase.OnPaint(e)  
     G.Clear(Parent.BackColor)  
     If Enabled Then  
       ETC = Color.FromArgb(66, 78, 90)  
       Select Case State  
         Case MouseState.Over, MouseState.Down  
           DrawRoundRect(G, New Rectangle(3, 3, 20, 20), 3, Color.FromArgb(44, 156, 218))  
         Case Else  
           DrawRoundRect(G, New Rectangle(3, 3, 20, 20), 3, GreyColor(200))  
       End Select  
       If Checked Then  
         Using I As Image = Image.FromStream(New IO.MemoryStream(Convert.FromBase64String(GetCheckMark)))  
           G.DrawImage(I, New Point(4, 5))  
         End Using  
       End If  
     Else  
       ETC = GreyColor(170)  
       DrawRoundRect(G, New Rectangle(3, 3, 20, 20), 3, GreyColor(220))  
       If Checked Then  
         Using I As Image = Image.FromStream(New IO.MemoryStream(Convert.FromBase64String(GetCheckMark)))  
           G.DrawImage(I, New Point(4, 5))  
         End Using  
       End If  
     End If  
     Using B As New SolidBrush(ETC)  
       If Bold Then  
         G.DrawString(Text, GlobalFont(FontStyle.Bold, 10), B, New Point(32, 4))  
       Else  
         G.DrawString(Text, GlobalFont(FontStyle.Regular, 10), B, New Point(32, 4))  
       End If  
     End Using  
   End Sub  
   Protected Overrides Sub OnMouseDown(e As MouseEventArgs)  
     MyBase.OnMouseDown(e)  
     State = MouseState.Down : Invalidate()  
   End Sub  
   Protected Overrides Sub OnMouseUp(e As MouseEventArgs)  
     MyBase.OnMouseUp(e)  
     If Enabled Then  
       Checked = Not Checked  
       RaiseEvent CheckedChanged(Me, e)  
     End If  
     State = MouseState.Over : Invalidate()  
   End Sub  
   Protected Overrides Sub OnMouseEnter(e As EventArgs)  
     MyBase.OnMouseEnter(e)  
     State = MouseState.Over : Invalidate()  
   End Sub  
   Protected Overrides Sub OnMouseLeave(e As EventArgs)  
     MyBase.OnMouseLeave(e)  
     State = MouseState.None : Invalidate()  
   End Sub  
 #End Region  
 End Class  
 Class FirefoxH1  
   Inherits Label  
 #Region " Private "  
   Private G As Graphics  
 #End Region  
 #Region " Control "  
   Sub New()  
     DoubleBuffered = True  
     AutoSize = False  
     Font = New Font("Segoe UI Semibold", 20)  
     ForeColor = Color.FromArgb(76, 88, 100)  
   End Sub  
   Protected Overrides Sub OnPaint(e As PaintEventArgs)  
     G = e.Graphics  
     G.SmoothingMode = SmoothingMode.HighQuality  
     G.TextRenderingHint = TextRenderingHint.ClearTypeGridFit  
     MyBase.OnPaint(e)  
     Using P As New Pen(GreyColor(200))  
       G.DrawLine(P, New Point(0, 50), New Point(Width, 50))  
     End Using  
   End Sub  
 #End Region  
 End Class  
 Class FirefoxH2  
   Inherits Label  
 #Region " Control "  
   Sub New()  
     Font = GlobalFont(FontStyle.Bold, 10)  
     ForeColor = Color.FromArgb(76, 88, 100)  
     BackColor = Color.White  
   End Sub  
 #End Region  
 End Class  
 Class FirefoxButton  
   Inherits Control  
 #Region " Private "  
   Private State As MouseState  
   Private ETC As Color = Nothing  
   Private G As Graphics  
   Private _EnabledCalc As Boolean  
 #End Region  
 #Region " Properties "  
   Public Shadows Property Enabled As Boolean  
     Get  
       Return EnabledCalc  
     End Get  
     Set(value As Boolean)  
       _EnabledCalc = value  
       Invalidate()  
     End Set  
   End Property  
   <DisplayName("Enabled")>  
   Public Property EnabledCalc As Boolean  
     Get  
       Return _EnabledCalc  
     End Get  
     Set(value As Boolean)  
       Enabled = value  
       Invalidate()  
     End Set  
   End Property  
 #End Region  
 #Region " Control "  
   Sub New()  
     DoubleBuffered = True  
     Enabled = True  
     ForeColor = Color.FromArgb(56, 68, 80)  
     Font = GlobalFont(FontStyle.Regular, 10)  
   End Sub  
   Protected Overrides Sub OnPaint(e As PaintEventArgs)  
     G = e.Graphics  
     G.SmoothingMode = SmoothingMode.HighQuality  
     G.TextRenderingHint = TextRenderingHint.ClearTypeGridFit  
     MyBase.OnPaint(e)  
     G.Clear(Parent.BackColor)  
     If Enabled Then  
       ETC = Color.FromArgb(56, 68, 80)  
       Select Case State  
         Case MouseState.None  
           Using B As New SolidBrush(GreyColor(245))  
             G.FillRectangle(B, New Rectangle(1, 1, Width - 2, Height - 2))  
           End Using  
           DrawRoundRect(G, FullRectangle(Size, True), 2, GreyColor(193))  
         Case MouseState.Over  
           Using B As New SolidBrush(GreyColor(232))  
             G.FillRectangle(B, New Rectangle(1, 1, Width - 2, Height - 2))  
           End Using  
           DrawRoundRect(G, FullRectangle(Size, True), 2, GreyColor(193))  
         Case Else  
           Using B As New SolidBrush(GreyColor(212))  
             G.FillRectangle(B, New Rectangle(1, 1, Width - 2, Height - 2))  
           End Using  
           DrawRoundRect(G, FullRectangle(Size, True), 2, GreyColor(193))  
       End Select  
     Else  
       ETC = GreyColor(170)  
       Using B As New SolidBrush(GreyColor(245))  
         G.FillRectangle(B, New Rectangle(1, 1, Width - 2, Height - 2))  
       End Using  
       DrawRoundRect(G, FullRectangle(Size, True), 2, GreyColor(223))  
     End If  
     CenterString(G, Text, GlobalFont(FontStyle.Regular, 10), ETC, FullRectangle(Size, False))  
   End Sub  
   Protected Overrides Sub OnMouseUp(e As MouseEventArgs)  
     MyBase.OnMouseUp(e)  
     State = MouseState.Over : Invalidate()  
   End Sub  
   Protected Overrides Sub OnMouseDown(e As MouseEventArgs)  
     MyBase.OnMouseUp(e)  
     State = MouseState.Down : Invalidate()  
   End Sub  
   Protected Overrides Sub OnMouseEnter(e As EventArgs)  
     MyBase.OnMouseEnter(e)  
     State = MouseState.Over : Invalidate()  
   End Sub  
   Protected Overrides Sub OnMouseLeave(e As EventArgs)  
     MyBase.OnMouseEnter(e)  
     State = MouseState.None : Invalidate()  
   End Sub  
 #End Region  
 End Class  
 Class FirefoxRedirect  
   Inherits Control  
 #Region " Private "  
   Private State As MouseState  
   Private G As Graphics  
   Private FC As Color = Nothing  
   Private FF As Font = Nothing  
 #End Region  
 #Region " Control "  
   Sub New()  
     DoubleBuffered = True  
     Cursor = Cursors.Hand  
     BackColor = Color.White  
   End Sub  
   Protected Overrides Sub OnPaint(e As PaintEventArgs)  
     G = e.Graphics  
     G.SmoothingMode = SmoothingMode.HighQuality  
     G.TextRenderingHint = TextRenderingHint.ClearTypeGridFit  
     MyBase.OnPaint(e)  
     Select Case State  
       Case MouseState.Over  
         FC = Color.FromArgb(23, 140, 229)  
         FF = GlobalFont(FontStyle.Underline, 10)  
       Case MouseState.Down  
         FC = Color.FromArgb(255, 149, 0)  
         FF = GlobalFont(FontStyle.Regular, 10)  
       Case Else  
         FC = Color.FromArgb(0, 149, 221)  
         FF = GlobalFont(FontStyle.Regular, 10)  
     End Select  
     Using B As New SolidBrush(FC)  
       G.DrawString(Text, FF, B, New Point(0, 0))  
     End Using  
   End Sub  
   Protected Overrides Sub OnMouseUp(e As MouseEventArgs)  
     MyBase.OnMouseUp(e)  
     State = MouseState.Over : Invalidate()  
   End Sub  
   Protected Overrides Sub OnMouseDown(e As MouseEventArgs)  
     MyBase.OnMouseUp(e)  
     State = MouseState.Down : Invalidate()  
   End Sub  
   Protected Overrides Sub OnMouseEnter(e As EventArgs)  
     MyBase.OnMouseEnter(e)  
     State = MouseState.Over : Invalidate()  
   End Sub  
   Protected Overrides Sub OnMouseLeave(e As EventArgs)  
     MyBase.OnMouseEnter(e)  
     State = MouseState.None : Invalidate()  
   End Sub  
 #End Region  
 End Class  
 Class FirefoxSubTabControl  
   Inherits TabControl  
 #Region " Private "  
   Private G As Graphics  
   Private TabRect As Rectangle  
 #End Region  
 #Region " Control "  
   Sub New()  
     DoubleBuffered = True  
     Alignment = TabAlignment.Top  
   End Sub  
   Protected Overrides Sub OnCreateControl()  
     MyBase.OnCreateControl()  
     SetStyle(ControlStyles.UserPaint, True)  
     ItemSize = New Size(100, 40)  
     SizeMode = TabSizeMode.Fixed  
   End Sub  
   Protected Overrides Sub OnControlAdded(e As ControlEventArgs)  
     MyBase.OnControlAdded(e)  
     Try  
       For i As Integer = 0 To TabPages.Count - 1  
         TabPages(i).BackColor = Color.White  
         TabPages(i).ForeColor = Color.FromArgb(66, 79, 90)  
         TabPages(i).Font = GlobalFont(FontStyle.Regular, 10)  
       Next  
     Catch  
     End Try  
   End Sub  
   Protected Overrides Sub OnPaint(e As PaintEventArgs)  
     G = e.Graphics  
     G.SmoothingMode = SmoothingMode.HighQuality  
     G.TextRenderingHint = TextRenderingHint.ClearTypeGridFit  
     MyBase.OnPaint(e)  
     G.Clear(Parent.BackColor)  
     For i As Integer = 0 To TabPages.Count - 1  
       TabRect = GetTabRect(i)  
       If GetTabRect(i).Contains(Me.PointToClient(Cursor.Position)) And Not SelectedIndex = i Then  
         Using B As New SolidBrush(GreyColor(240))  
           G.FillRectangle(B, New Rectangle(GetTabRect(i).Location.X - 2, GetTabRect(i).Location.Y - 2, GetTabRect(i).Width, GetTabRect(i).Height + 1))  
         End Using  
       ElseIf SelectedIndex = i Then  
         Using B As New SolidBrush(GreyColor(240))  
           G.FillRectangle(B, New Rectangle(GetTabRect(i).Location.X - 2, GetTabRect(i).Location.Y - 2, GetTabRect(i).Width, GetTabRect(i).Height + 1))  
         End Using  
         Using P As New Pen(Color.FromArgb(255, 149, 0), 4)  
           G.DrawLine(P, New Point(TabRect.X - 2, TabRect.Y + ItemSize.Height - 2), New Point(TabRect.X + TabRect.Width - 2, TabRect.Y + ItemSize.Height - 2))  
         End Using  
       ElseIf Not SelectedIndex = i Then  
         G.FillRectangle(Brushes.White, GetTabRect(i))  
       End If  
       Using B As New SolidBrush(Color.FromArgb(56, 69, 80))  
         CenterStringTab(G, TabPages(i).Text, GlobalFont(FontStyle.Regular, 10), B, GetTabRect(i))  
       End Using  
     Next  
     Using P As New Pen(GreyColor(200))  
       G.DrawLine(P, New Point(0, ItemSize.Height + 2), New Point(Width, ItemSize.Height + 2))  
     End Using  
   End Sub  
 #End Region  
 End Class  
 Class FirefoxMainTabControl  
   Inherits TabControl  
 #Region " Private "  
   Private G As Graphics  
   Private TabRect As Rectangle  
   Private FC As Color = Nothing  
 #End Region  
 #Region " Control "  
   Sub New()  
     DoubleBuffered = True  
     ItemSize = New Size(43, 152)  
     Alignment = TabAlignment.Left  
     SizeMode = TabSizeMode.Fixed  
   End Sub  
   Protected Overrides Sub OnCreateControl()  
     MyBase.OnCreateControl()  
     SetStyle(ControlStyles.UserPaint, True)  
   End Sub  
   Protected Overrides Sub OnControlAdded(e As ControlEventArgs)  
     MyBase.OnControlAdded(e)  
     Try  
       For i As Integer = 0 To TabPages.Count - 1  
         TabPages(i).BackColor = Color.White  
         TabPages(i).ForeColor = Color.FromArgb(66, 79, 90)  
         TabPages(i).Font = GlobalFont(FontStyle.Regular, 10)  
       Next  
     Catch  
     End Try  
   End Sub  
   Protected Overrides Sub OnPaint(e As PaintEventArgs)  
     G = e.Graphics  
     G.SmoothingMode = SmoothingMode.HighQuality  
     G.TextRenderingHint = TextRenderingHint.ClearTypeGridFit  
     MyBase.OnPaint(e)  
     G.Clear(Color.FromArgb(66, 79, 90))  
     For i As Integer = 0 To TabPages.Count - 1  
       TabRect = GetTabRect(i)  
       If SelectedIndex = i Then  
         Using B As New SolidBrush(Color.FromArgb(52, 63, 72))  
           G.FillRectangle(B, TabRect)  
         End Using  
         FC = GreyColor(245)  
         Using B As New SolidBrush(Color.FromArgb(255, 175, 54))  
           G.FillRectangle(B, New Rectangle(TabRect.Location.X - 3, TabRect.Location.Y + 1, 5, TabRect.Height - 2))  
         End Using  
       Else  
         FC = GreyColor(192)  
         Using B As New SolidBrush(Color.FromArgb(66, 79, 90))  
           G.FillRectangle(B, TabRect)  
         End Using  
       End If  
       Using B As New SolidBrush(FC)  
         G.DrawString(TabPages(i).Text, GlobalFont(FontStyle.Regular, 10), B, New Point(TabRect.X + 50, TabRect.Y + 12))  
       End Using  
       If Not IsNothing(ImageList) Then  
         If Not TabPages(i).ImageIndex < 0 Then  
           G.DrawImage(ImageList.Images(TabPages(i).ImageIndex), New Rectangle(TabRect.X + 19, TabRect.Y + ((TabRect.Height / 2) - 10), 18, 18))  
         End If  
       End If  
     Next  
   End Sub  
 #End Region  
 End Class  
 <DefaultEvent("TextChanged")>  
 Class FirefoxTextbox  
   Inherits Control  
 #Region " Private "  
   Private WithEvents TB As New TextBox  
   Private G As Graphics  
   Private State As MouseState  
   Private IsDown As Boolean  
   Private _EnabledCalc As Boolean  
   Private _allowpassword As Boolean = False  
   Private _maxChars As Integer = 32767  
   Private _textAlignment As HorizontalAlignment  
   Private _multiLine As Boolean = False  
   Private _readOnly As Boolean = False  
 #End Region  
 #Region " Properties "  
   Public Shadows Property Enabled As Boolean  
     Get  
       Return EnabledCalc  
     End Get  
     Set(value As Boolean)  
       TB.Enabled = value  
       _EnabledCalc = value  
       Invalidate()  
     End Set  
   End Property  
   <DisplayName("Enabled")>  
   Public Property EnabledCalc As Boolean  
     Get  
       Return _EnabledCalc  
     End Get  
     Set(value As Boolean)  
       Enabled = value  
       Invalidate()  
     End Set  
   End Property  
   Public Shadows Property UseSystemPasswordChar() As Boolean  
     Get  
       Return _allowpassword  
     End Get  
     Set(ByVal value As Boolean)  
       TB.UseSystemPasswordChar = UseSystemPasswordChar  
       _allowpassword = value  
       Invalidate()  
     End Set  
   End Property  
   Public Shadows Property MaxLength() As Integer  
     Get  
       Return _maxChars  
     End Get  
     Set(ByVal value As Integer)  
       _maxChars = value  
       TB.MaxLength = MaxLength  
       Invalidate()  
     End Set  
   End Property  
   Public Shadows Property TextAlign() As HorizontalAlignment  
     Get  
       Return _textAlignment  
     End Get  
     Set(ByVal value As HorizontalAlignment)  
       _textAlignment = value  
       Invalidate()  
     End Set  
   End Property  
   Public Shadows Property MultiLine() As Boolean  
     Get  
       Return _multiLine  
     End Get  
     Set(ByVal value As Boolean)  
       _multiLine = value  
       TB.Multiline = value  
       OnResize(EventArgs.Empty)  
       Invalidate()  
     End Set  
   End Property  
   Public Shadows Property [ReadOnly]() As Boolean  
     Get  
       Return _readOnly  
     End Get  
     Set(ByVal value As Boolean)  
       _readOnly = value  
       If TB IsNot Nothing Then  
         TB.ReadOnly = value  
       End If  
     End Set  
   End Property  
 #End Region  
 #Region " Control "  
   Protected Overrides Sub OnTextChanged(ByVal e As EventArgs)  
     MyBase.OnTextChanged(e)  
     Invalidate()  
   End Sub  
   Protected Overrides Sub OnBackColorChanged(ByVal e As EventArgs)  
     MyBase.OnBackColorChanged(e)  
     Invalidate()  
   End Sub  
   Protected Overrides Sub OnForeColorChanged(ByVal e As EventArgs)  
     MyBase.OnForeColorChanged(e)  
     TB.ForeColor = ForeColor  
     Invalidate()  
   End Sub  
   Protected Overrides Sub OnFontChanged(ByVal e As EventArgs)  
     MyBase.OnFontChanged(e)  
     TB.Font = Font  
   End Sub  
   Protected Overrides Sub OnGotFocus(ByVal e As EventArgs)  
     MyBase.OnGotFocus(e)  
     TB.Focus()  
   End Sub  
   Private Sub TextChangeTb() Handles TB.TextChanged  
     Text = TB.Text  
   End Sub  
   Private Sub TextChng() Handles MyBase.TextChanged  
     TB.Text = Text  
   End Sub  
   Public Sub NewTextBox()  
     With TB  
       .Text = String.Empty  
       .BackColor = Color.White  
       .ForeColor = Color.FromArgb(66, 78, 90)  
       .TextAlign = HorizontalAlignment.Left  
       .BorderStyle = BorderStyle.None  
       .Location = New Point(3, 3)  
       .Font = GlobalFont(FontStyle.Regular, 10)  
       .Size = New Size(Width - 3, Height - 3)  
       .UseSystemPasswordChar = UseSystemPasswordChar  
     End With  
   End Sub  
   Sub New()  
     MyBase.New()  
     NewTextBox()  
     Controls.Add(TB)  
     SetStyle(ControlStyles.UserPaint Or ControlStyles.SupportsTransparentBackColor, True)  
     DoubleBuffered = True  
     TextAlign = HorizontalAlignment.Left  
     ForeColor = Color.FromArgb(66, 78, 90)  
     Font = GlobalFont(FontStyle.Regular, 10)  
     Size = New Size(130, 29)  
     Enabled = True  
   End Sub  
   Protected Overrides Sub OnPaint(ByVal e As PaintEventArgs)  
     G = e.Graphics  
     G.SmoothingMode = SmoothingMode.HighQuality  
     G.TextRenderingHint = TextRenderingHint.ClearTypeGridFit  
     MyBase.OnPaint(e)  
     G.Clear(Parent.BackColor)  
     If Enabled Then  
       TB.ForeColor = Color.FromArgb(66, 78, 90)  
       If State = MouseState.Down Then  
         DrawRoundRect(G, FullRectangle(Size, True), 3, Color.FromArgb(44, 156, 218))  
       Else  
         DrawRoundRect(G, FullRectangle(Size, True), 3, GreyColor(200))  
       End If  
     Else  
       TB.ForeColor = GreyColor(170)  
       DrawRoundRect(G, FullRectangle(Size, True), 3, GreyColor(230))  
     End If  
     TB.TextAlign = TextAlign  
     TB.UseSystemPasswordChar = UseSystemPasswordChar  
   End Sub  
   Protected Overrides Sub OnResize(e As EventArgs)  
     MyBase.OnResize(e)  
     If Not MultiLine Then  
       Dim tbheight As Integer = TB.Height  
       TB.Location = New Point(10, CType(((Height / 2) - (tbheight / 2) - 0), Integer))  
       TB.Size = New Size(Width - 20, tbheight)  
     Else  
       TB.Location = New Point(10, 10)  
       TB.Size = New Size(Width - 20, Height - 20)  
     End If  
   End Sub  
   Protected Overrides Sub OnEnter(e As EventArgs)  
     MyBase.OnEnter(e)  
     State = MouseState.Down : Invalidate()  
   End Sub  
   Protected Overrides Sub OnLeave(e As EventArgs)  
     MyBase.OnLeave(e)  
     State = MouseState.None : Invalidate()  
   End Sub  
 #End Region  
 End Class  
 Class FirefoxNumericUpDown  
   Inherits Control  
 #Region " Private "  
   Private G As Graphics  
   Private _Value As Integer  
   Private _Min As Integer  
   Private _Max As Integer  
   Private Loc As Point  
   Private Down As Boolean  
   Private _EnabledCalc As Boolean  
   Private ETC As Color = Nothing  
 #End Region  
 #Region " Properties "  
   Public Shadows Property Enabled As Boolean  
     Get  
       Return EnabledCalc  
     End Get  
     Set(value As Boolean)  
       _EnabledCalc = value  
       Invalidate()  
     End Set  
   End Property  
   <DisplayName("Enabled")>  
   Public Property EnabledCalc As Boolean  
     Get  
       Return _EnabledCalc  
     End Get  
     Set(value As Boolean)  
       Enabled = value  
       Invalidate()  
     End Set  
   End Property  
   Public Property Value As Integer  
     Get  
       Return _Value  
     End Get  
     Set(v As Integer)  
       If v <= _Max And v >= Minimum Then  
         _Value = v  
       End If  
       Invalidate()  
     End Set  
   End Property  
   Public Property Minimum As Integer  
     Get  
       Return _Min  
     End Get  
     Set(v As Integer)  
       If v < Maximum Then  
         _Min = v  
       End If  
       If Value < Minimum Then  
         Value = Minimum  
       End If  
       Invalidate()  
     End Set  
   End Property  
   Public Property Maximum As Integer  
     Get  
       Return _Max  
     End Get  
     Set(v As Integer)  
       If v > Minimum Then  
         _Max = v  
       End If  
       If Value > Maximum Then  
         Value = Maximum  
       End If  
       Invalidate()  
     End Set  
   End Property  
 #End Region  
 #Region " Control "  
   Sub New()  
     DoubleBuffered = True  
     Value = 0  
     Minimum = 0  
     Maximum = 100  
     Cursor = Cursors.IBeam  
     BackColor = Color.White  
     ForeColor = Color.FromArgb(66, 78, 90)  
     Font = GlobalFont(FontStyle.Regular, 10)  
     Enabled = True  
   End Sub  
   Protected Overrides Sub OnMouseMove(e As MouseEventArgs)  
     MyBase.OnMouseMove(e)  
     Loc.X = e.X  
     Loc.Y = e.Y  
     Invalidate()  
     If Loc.X < Width - 23 Then  
       Cursor = Cursors.IBeam  
     Else  
       Cursor = Cursors.Default  
     End If  
   End Sub  
   Protected Overrides Sub OnResize(ByVal e As EventArgs)  
     MyBase.OnResize(e)  
     Height = 30  
   End Sub  
   Protected Overrides Sub OnMouseDown(ByVal e As MouseEventArgs)  
     MyBase.OnMouseClick(e)  
     If Enabled Then  
       If Loc.X > Width - 21 AndAlso Loc.X < Width - 3 Then  
         If Loc.Y < 15 Then  
           If (Value + 1) <= Maximum Then  
             Value += 1  
           End If  
         Else  
           If (Value - 1) >= Minimum Then  
             Value -= 1  
           End If  
         End If  
       Else  
         Down = Not Down  
         Focus()  
       End If  
     End If  
     Invalidate()  
   End Sub  
   Protected Overrides Sub OnKeyPress(ByVal e As System.Windows.Forms.KeyPressEventArgs)  
     MyBase.OnKeyPress(e)  
     Try  
       If Down Then  
         Value = Value & e.KeyChar.ToString  
       End If  
       If Value > Maximum Then  
         Value = Maximum  
       End If  
     Catch  
     End Try  
   End Sub  
   Protected Overrides Sub OnKeyup(ByVal e As System.Windows.Forms.KeyEventArgs)  
     MyBase.OnKeyUp(e)  
     If e.KeyCode = Keys.Up Then  
       If (Value + 1) <= Maximum Then  
         Value += 1  
       End If  
       Invalidate()  
     ElseIf e.KeyCode = Keys.Down Then  
       If (Value - 1) >= Minimum Then  
         Value -= 1  
       End If  
     ElseIf e.KeyCode = Keys.Back Then  
       Dim BC As String = Value.ToString()  
       BC = BC.Remove(Convert.ToInt32(BC.Length - 1))  
       If (BC.Length = 0) Then  
         BC = "0"  
       End If  
       Value = Convert.ToInt32(BC)  
     End If  
     Invalidate()  
   End Sub  
   Protected Overrides Sub OnPaint(e As PaintEventArgs)  
     G = e.Graphics  
     G.SmoothingMode = SmoothingMode.HighQuality  
     G.TextRenderingHint = TextRenderingHint.ClearTypeGridFit  
     MyBase.OnPaint(e)  
     G.Clear(Parent.BackColor)  
     If Enabled Then  
       ETC = Color.FromArgb(66, 78, 90)  
       Using P As New Pen(GreyColor(190))  
         DrawRoundRect(G, FullRectangle(Size, True), 2, GreyColor(190))  
         G.DrawLine(P, New Point(Width - 24, 13.5F), New Point(Width - 5, 13.5F))  
       End Using  
       DrawRoundRect(G, New Rectangle(Width - 24, 4, 19, 21), 3, GreyColor(200))  
     Else  
       ETC = GreyColor(170)  
       Using P As New Pen(GreyColor(230))  
         DrawRoundRect(G, FullRectangle(Size, True), 2, GreyColor(190))  
         G.DrawLine(P, New Point(Width - 24, 13.5F), New Point(Width - 5, 13.5F))  
       End Using  
       DrawRoundRect(G, New Rectangle(Width - 24, 4, 19, 21), 3, GreyColor(220))  
     End If  
     Using B As New SolidBrush(ETC)  
       G.DrawString("t", New Font("Marlett", 8, FontStyle.Bold), B, New Point(Width - 22, 5))  
       G.DrawString("u", New Font("Marlett", 8, FontStyle.Bold), B, New Point(Width - 22, 13))  
       CenterString(G, Value, New Font("Segoe UI", 10), ETC, New Rectangle(Width / 2 - 10, 0, Width - 5, Height))  
     End Using  
   End Sub  
 #End Region  
 End Class  

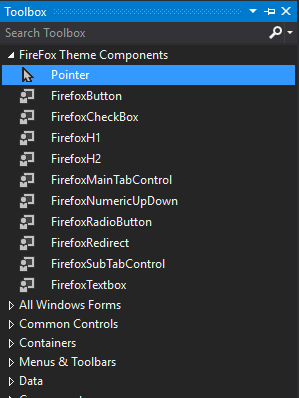
Now just go click Build > Build Solution that's it, then you can find a set a of FireFix components in your ToolBox like this :


All the credits to : AeroRev9

How to Make a WIFI Hotspot Creator in VB.NET


You'll find many programs on the internet that can turn your Computer/Laptop Internet into a WIFI Hotspot but this ain't no any advanced like this. This is a very simple program to make a WIFI Hotspot using the Netsh command line scripting utility that comes with Windows.

Let's get into it...

Tools Required
  • 2 Textboxes
  • 2 Labels
  • 1 Checkbox
  • 2 Buttons
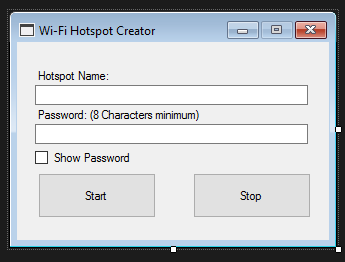
Change TEXT in the added Tools like given below
  • Label 1 - Hotspot Name:
  • Label 2 - Password: (8 Characters minimum)
  • CheckBox1 - Show Password
  • Button1 - Start
  • Button2 - Stop
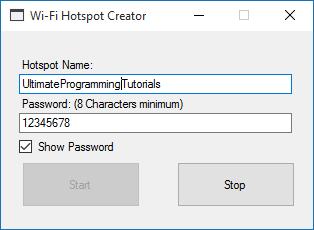
Make sure your FORM looks like this :


Double click your Form to get into Form_Load Event and add this code to disable the Button2 (Stop)
 Button2.Enabled = False
Add this code for FormClosed Event to stop the Hotspot automatically when you close the program
Process.Start("CMD", "/C netsh wlan stop hostednetwork")
  Now go to Button1_Click and add these :

   Try  
       If TextBox1.Text = "" Then  
         MsgBox("Hotspot Name can't be empty", MsgBoxStyle.Critical)  
       End If  
       If TextBox2.TextLength < 8 Then  
         MsgBox("Password should be 8+ characters", MsgBoxStyle.Critical)  
         If TextBox2.Text = "" Then  
           MsgBox("Password can't be empty", MsgBoxStyle.Critical)  
         End If  
       Else  
         Dim process As New Process()  
         process.StartInfo.Verb = "runas"  
         process.StartInfo.UseShellExecute = True  
         process.Start("cmd", String.Format("/c {0} & {1} & {2}", "netsh wlan set hostednetwork mode=allow ssid=" & TextBox1.Text & " key=" & TextBox2.Text, "netsh wlan start hostednetwork", "pause"))  
         MsgBox("Hotspot started successfully", MsgBoxStyle.Information)  
         Button1.Enabled = False  
         Button2.Enabled = True  
       End If  
     Catch ex As Exception  
       MsgBox("Failed to establish a hotspot" & ex.Message, MsgBoxStyle.Information)  
     End Try  

Add this to Button2_Click :

   Button2.Enabled = False  
     Process.Start("CMD", "/C netsh wlan stop hostednetwork")  
     Button1.Enabled = True  
     MsgBox("Hotspot stopped successfully", MsgBoxStyle.Information)  

Finally just go add this piece of code to CheckBox1_Checked :

     If CheckBox1.CheckState = CheckState.Checked Then  
       TextBox2.UseSystemPasswordChar = False  
     End If  
     If CheckBox1.CheckState = CheckState.Unchecked Then  
       TextBox2.UseSystemPasswordChar = True  
     End If  

That's it! let's Run the program, Just set a Hotspot Name and a Password then click on Start


Now check your Phone or any other devices for WIFI connections, this is a screenshot from my Phone :


Hope it works fine with y'all...

How to Fix High CPU Usage / Memory Usage / Disk Usage (Service Host: Local Service) in Windows 10, 8.1, 8, 7


Before you try this method please try the above mentioned methods :

  • sfc /scannow
  • Dism /Online /Cleanup-Image /RestoreHealth
  • Disable service "SuperFetch"
If you have tried all of them and still didn't get the issue fixed out then this is for you.

  1. Identify if you are running the inbox AHCI driver (StorAHCI.sys):

    1. Open up your Computer Management by Win + R then put in devmgmt.msc and hit enter
    2. Under IDE ATA/ATAPI Controllers right-click on the AHCI controller node and select Properties. This node is usually called “Standard SATA AHCI Controller.”
    3. Navigate to the driver tab and click Driver Details.
    4. If you see “StorAHCI.sys” in the list, you are running the inbox driver.

    StorAHCI.sys
  2. Disable MSI for the controller in the registry:
    1. In the same properties window opened in step 1.2, navigate to the Details tab and select Device instance path from the Property drop-down menu. Note this path. 

    Device instance path

    1. Open the registry editor by typing regedit in the previously opened command prompt.
    2. Navigate to: HKEY_LOCAL_MACHINE\System\CurrentControlSet\Enum\PCI\ <AHCI Controller>\Device Parameters\Interrupt Management\MessageSignaledInterruptProperties, where <AHCI Controller> refers to the device instance path you noted in step 2.1. 
    3. Change the value of the MSISupported key from “1” to “0”.
    1. If you don’t know which controller your boot device is attached to, repeat steps 2.1 through 2.4 for all AHCI controllers found under 1.2.

    MSISupported Regedit
  3. Reboot the machine.
It fixed the problem in my case see :


Hope this helps.

Credits to : Microsoft Support

How to Uninstall Annoying Windows 10 Photos App


One of the most annoying thing I noticed with Windows 10 is this... if you want to permanently uninstall this program just follow these steps.

Open Windows PowerShell

You can find Windows PowerShell in All Apps > Windows PowerShell > Windows PowerShell or just search for PowerShell in your Start Menu and make sure you run Windows PowerShell as Administrator.

Run the Command

Copy & Paste (You can Paste by Right Clicking inside the PowerShell)  this command into PowerShell  : Get-AppxPackage *photo* | Remove-AppxPackage and then just hit Enter, that's it! Game Over!


16 Super Simple Social Media Hacks to Master Content Marketing

Every business is operated by the lead generation. This lead is primarily gained from digital marketing. As social media evolved into the primary digital marketing platforms of the present day, the need for the online marketers with expert distinct strategies has increased to foresee effective business results.

Content marketing is the high-end grade in social media marketing and plays a prominent role in online promotions with about 28 % of an organization’s marketing budget being spent on it. This shows how important content marketing strategy plays a role in enterprise publicity. 

The powerful content marketing made it easier to execute strategies and convert leads into happy customers.


While many content marketers are already aware of the basic skills of content marketing, there are certain simple hacks to double the results and generate an effective number of leads. If you want to be successful in your content marketing efforts, then try these following simple hacks:

     ⦁    Audience research
Marketing begins with research on the type of audience the business is targeted. Many of the successful content marketers take this phase very seriously. They start with a light research on the basic customer persona and make a note on everything about their demographics.

Most importantly, they arrive at an assumption to get closer to the truth about the audience.

     ⦁    Relevant current content

If blog posts are too generalized, lest people show interest. It is necessary to keep content fresh and always include topics related to the latest industry trends and global events.

Posts related to people’s interest has the higher chance of getting hits and shares.

     ⦁    Attracting Environment

While a writer comes across a new eye-catchy idea or object, that’s the moment he uses his full potential to generate, repeat, and connect with customers to attract attention, loyalty, and trust.
Successful writers create this environment through attractive storytelling, in a most primitive and powerful form.

     ⦁    Content is the king
Don’t hasten when composing a blog post. Firstly, you must make sure that the content is relevant, engaging, interesting, and unique.

If you are successful in the efforts of sharing valuable content across the social media, it itself can get you through the desired results than paid promotions.

     ⦁    Deep content
The important hack also one of the simplest is writing a deeper content. For SEO branding, content should be of the long form. Great content engages both customers and search engines. Longer and deeper content provides more value to the audience and is completely adored by Google.

The length of the content plays a major role in attracting viewers. An average length of interesting articles is estimated to be over 2,400 words.

However, this doesn't mean creation of a redundant copy of articles. Each word must ensure a value to fulfill visitors’ intention.

     ⦁    Draw the reader

Focus on the title and first few lines. The first 10 words must be catchy and informative. These words drive attention when filled with quirky verbs, interesting examples, and uncanny twists. All these things make sure the audience don’t get run over!

Once you grab the readers’ attention, it is time to engage them with simple, interesting stories. If it is achieved, you are sure to build momentum on social media.

     ⦁    Usage of specific details

In stimulating audience visually, authentic stories hold a value. Each sentence plays a role. When the content carries an implicit story structure, the readers experience it through their own memories.
The more specific the text, the more powerful the story will resonate with the audience.

     ⦁    Instilling Tweetable quotes
An easy way to grow following and lead generation is by adding tweetable quotes within the body of an article.


This simple hack requires just an easy downloadable WordPress plugin or any relevant service or application. This process results in a massive growth of leads through social media.

     ⦁    Image optimization
Putting relevant images in the posts brings an attractive appeal to the written text. It transforms the outlook of the blog completely.

Simply putting images won’t work. The images must attract viewers when shared with other major sites.

Adding the name of your site within the image adds a great value for your business. Many applications and tools are available to insert text within the images.

Images incorporating texts also work great on certain social platforms like Pinterest. This image naming convention makes a stamp of your brand in a reader’s mind.

     ⦁     Share-worthy content
If you are the one who runs a social media page for building the business network, then it is an ideal option to share your valuable content that attracts users.

This way your posts are fed in the news feed and are more likely be read and shared.


So, you must go with the flow to enjoy more hits among your followers.

     ⦁     Include share buttons to all posts
Once you have articulated a killer looking content, it’s time to share this content.

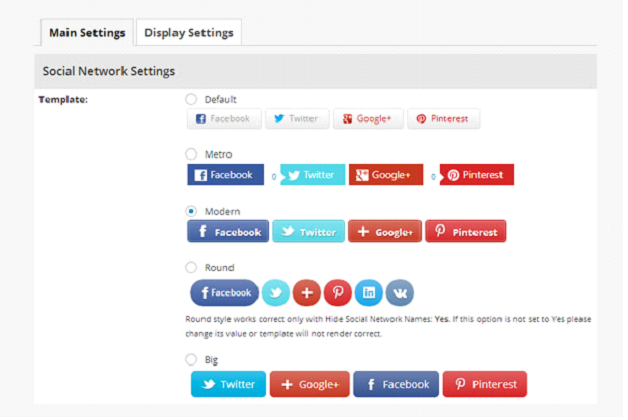
Easy Social Share Button
To make the sharing process seamless, include share buttons at the end of every post. This will simplify the process of sharing and radically generate social hype. Social media sharing buttons  make sharing easier. This surely will make a big difference in long-run.


     ⦁     Analysis
Successful content marketers don’t base their success on subjective factors, rather they reckon on the numbers and analytics to see if their strategy is working or not. Instead of just sitting and believing that their readers are engaging themselves; they question them directly. They dig deep, analyze their assumption and validate their results, before making proper changes.

     ⦁     Networking

Rather than concentrating more on eventual pieces to get created and published, successful content marketers invest their part of a time in building a professional network.

Many possible approaches associate with professional content marketing. These include Learning from others, reaching out for guest blogging, widening the network of publishing medium and attaining insights on similar industries. All these make a decent impact on marketing.

     ⦁     Diversification

Successful content marketers don’t stick with a just single area of expertise, instead, they try to expand the types of content they produce, including images and videos (if any). They expand recruitment of guest bloggers from third-party authorities.

This process keep readers engaged, and keep a track of changing reader’s interest.

     ⦁     Experimentation
When content marketers recognize a certain pattern is working, they stick with it thoroughly.
However, along with maintaining ROI, successful content marketers, also experiment on a regular basis, throwing in new topics and content formats that they believe their audience would typically expect. Even though it is a bit risky, and doesn’t always bring fruitful results, yet it keeps you away from falling into a trench.

     ⦁     Long-term nature
Content marketing is known for its long-term nature. The content always has time to alter the existing, outdated points, add new information and audit own strategies to join the ranks of the ruling in class.
 
Conclusion…
To succeed in social media marketing, it is necessary to keep up a cliché-free zone. As the world spins faster, it is tougher to uphold customers’ attention. Wise content marketing draws more customers into your vision and sustains their bond with your products and services.

You are positioned well to acquire better results in terms of the number of leads, shares and closed business by executing these techniques.

Author Bio:

Sirisha Paladhi possesses love and passion towards writing, which brought her into this field. Presently, she is working as a Content Writer at Mindmajix. During her career, she has written many articles on technology innovations. In her pass time, she relishes in making handy-crafts.

LinkedIn URL: https://www.linkedin.com/in/paladhi-sirisha-74987881/